VWCC Voicemail How-Tos

How to…

Voicemail Specifics

  • Maximum length of greeting: 60 seconds
  • Maximum length of recorded message: 5 minutes (300 seconds)
  • Maximum number of messages*: 1 hour of messages
  • Life span of messages*: 60 days
  • Length of password: 3-10 digits

* subject to change in order to maintain system performance

Cisco 7961 Phone How-Tos

How to…

Telephones & Voicemail

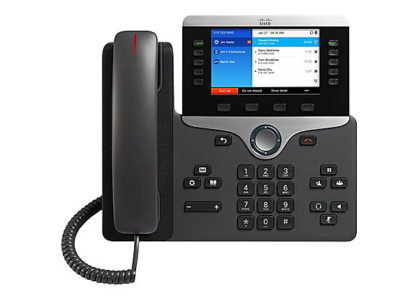
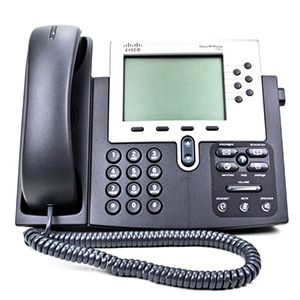
The college uses Cisco IP phones, which are full-featured telephones that communicate over an Internet Protocol (IP) network. These phones function much like a digital business telephone, allowing you to place and receive calls and access features such as mute, hold, transfer, speed dial, call forward, and more.

Telephones

The telephones on campus use the same network that the computers use, and often your computer is plugged into your phone before it plugs into the wall. Basic functions are:

  • Dial 8- before the phone number to dial another Virginia state college or agency. This will not bill long distance.
  • Dial 9- before the phone number for any other calls, including long distance. Not all phones are set up to dial long distance.

If long distance access is needed on your phone, contact the Help Desk. Long distance should not be used for personal calls — the college is billed for these.

Each classroom has a telephone, but they will not ring and are only to be used in case of emergency.

You can access your phone’s online settings, such as Fast Dial and My Address Book, by visiting https://vwtss150.vw.edu/ccmuser.

Which phone do you have?

Cisco 7961 phone Cisco 88xx phone

Voicemail

Voicemail is normally only available if you have a phone number assigned directly to you. There are several different indicators that you have a voicemail:

  • a red light at the top of the handset
  • an envelope icon next to your phone number on the screen
  • a message on the second to last line of your phone display

Voicemail can be accessed by pressing the messages button on your phone and entering your voicemail password. You will also receive voicemail messages as an email attachment in your VWCC email account.

If you have never checked your voicemail, please contact the Help Desk to gain access.

Additional resources

Network Drive Mappings & Best Practices

IET presents multiple drive letters to each user. The intention is to enable each user to organize data and segregate it onto the appropriate storage. This practice enables the college to maximize its investment in storage and backup systems. Space is not limited, it is managed. Users are provided with as much space as necessary to contain all data needed to perform their job function.

H: Drive

Each user gets an H: drive that provides access to an area that holds application install points. This area is also used as a location for applications that are being distributed using either Desktop Authority or Microsoft Configuration Manager.

I: Drive

Each user gets an I: drive for data that is for the sole use of that person. This is protected by security restrictions to allow access by the user and no others. The I: drive is for important data that is not to be shared with others. Quota limits are in place for this drive. There is no limit on the amount of data that can be stored on this drive. The My Documents folder, Desktop, Pictures, Downloads,  is redirected to the network I: drive to prevent loss of data in the event of a failure of a local C: drive which is the default location for My Documents on Windows systems.

J: Drive

The J: drive is a departmental shared drive to hold data that needs to be accessible to others in the department. All departmental faculty and staff have full access to this location unless restrictions have been implemented at the request of the head of the department. This is also the location for the departmental “scan” folder where all documents scanned from the department’s printer/copier are temporarily placed. This drive also counts against the file owner’s disk quota.

K: Drive

The K: drive is for Faculty to place documents that need to be accessible to students from any Academic lab. The owner of the drive has full access to place, modify and delete files in their own personal folder. All others have read-only access.

L: Drive

The L: drive is a special shared drive. This location is for documents that need to be accessible across departments. Many special functional groups/committees exist that require collaboration on documents. By default, all faculty/staff have read-only access to this structure, with full access controlled by membership of specific groups (i.e. Budget Committee, Campus Safety and Security).  This access level is granted through request of the respective committee chair. This drive also counts against the file owner’s disk quota.

N: Drive

The N: drive is for Faculty to place documents that need to be accessible to students from any Academic lab. Anyone who can access this location has full access to view, modify or delete any files located here. This was originally created to allow students to store “work in progress” class work if they did not have a flash drive to store their work.

U: Drive

The U: drive is storage for utility data. This can be used for large data that is needed for special departmental needs. Examples are graphics, archival of data, videos and other data that is large in nature and could adversely affect disk quotas.

Wireless Access

The college provides a robust wireless network that supports access with  personally-owned devices.

VWCCWiFi

Students, VWCC and VCCS faculty, and staff using personally-owned devices can sign on to the VWCCWiFi network with their MyVWCC username and password.

Detailed instructions can be found here.

VWCCU

VWCCU is our WiFi network for campus visitors that do not have a MyVWCC username and password. An employee will need to sponsor a visiting wireless user and request this access through the Help Desk.

Panopto

Panopto is the lecture capture system of choice for Virginia Western Community College. The Panopto interface is streamlined to be simple to use in the classroom. With just a few clicks, you can be recording the audio and video of your classroom instruction, or creating videos to supplement your instruction.

Panopto allows you to:

  • Create your course material from anywhere. The Panopto Focus client can be downloaded and used from any compatible Mac, PC, or iOS device connected to the internet.
  • Record multimedia course introductions, section reviews, lab demonstrations, and more — all from your laptop or iOS device.
  • Capture your screen, audio, and video support for webcams and other devices.
  • Supplement your recordings with PDF attachments and synchronized PowerPoint slides.

Panopto is integrated with Canvas to limit recording viewing to just students registered to your class.

To access Panopto in the classroom, click the Panopto link on the desktop, or use your browser and navigate to http://vwcc.hosted.panopto.com.

If you have Panopto folders you cannot view using your MyVWCC Panopto account, contact the Help Desk for assistance.

Additional Resources

Create a Shortcut to a File on the Network

Do you save files to your workstation desktop? Are these files safe and secure?

The desktop on your computer should only be used for shortcuts to documents you have already saved on the Virginia Western network. Files saved to your desktop could be lost if your computer has to be reimaged, and these files are not backed up.

When using a networked Virginia Western computer, you should always save your files to your I: drive or your shared departmental J: drive. Each employee who has requested access to Virginia Western’s network is given network storage space. This space is backed up nightly.

To create a shortcut to a saved network file:

  1.  In Windows, right-click on the Start button and choose Open Windows Explorer.
  2. Locate the file, which should be on your I: or J: drive.
  3. Right-click on the file, then choose Send To and then Desktop (create shortcut).

A shortcut icon for the file will now be on your desktop, but the file itself will still be saved on your networked drive.

How to Clear a Printer Jam

First, observe the message on the printer display — this often indicates the area of the jam.

Following are places to check after observing the message. If the message does not indicate the area of the jam, check each area until it is located.

  • Check the top of the printer by lifting the top cover accessible from the front of the printer. Look inside with the lid open to see if paper is partially pulled up into the printer. If so, gently pull it out.
  • The print cartridge may be lifted out carefully. If paper is lodged in the paper path, gently remove it.
  • Each tray may be removed. Ensure that paper is seated in the tray. Look inside after removing the tray to see if paper is partially pulled up into the printer. If so, gently pull it out.
  • Jams may occur in the duplexer unit in the rear of the printer. This can be removed easily.

If these areas have been checked and there is still a problem, contact the Help Desk at 7-7354 and report the problem.

Searching for Emails Using Barracuda Archive Tools

There are four options for searching for emails using Barracuda Archive Tools.

Barracuda Plugin for Outlook

Note: This option is not available for Office 365 Webmail. Please use one of the other options below.

  1. In the Outlook client, select the Home tab and look for the Barracuda Networks section in the upper right hand corner of the screen.
    outlook toolbar
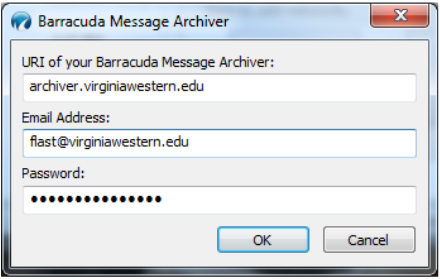
  2. Choose Search Archive. The first time you do this, a login box will appear. If prompted for the URI, enter archiver.virginiawestern.edu. Use your email credentials to log in.
    barracuda message archiver setup
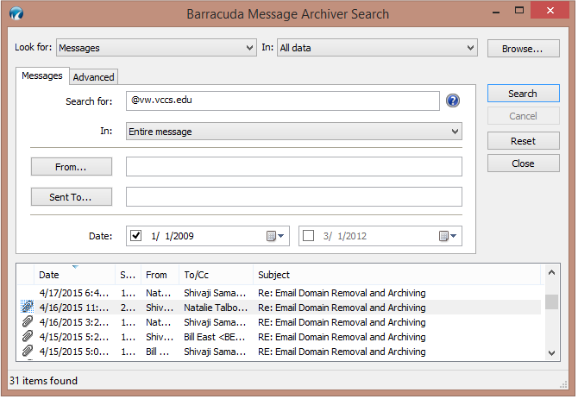
  3. The Search box will appear. Use the available options to search for the email you are looking for.
    barracuda message archiver search

You can search your archived mail by criteria you choose, such as text, dates, folder locations, and so on. For example, to deal with the scheduled removal of the @vw.vccs.edu domain, you would locate the senders who are still using your old email address by searching for @vw.vccs.edu as shown above. The search output window would display all email received after January 1, 2009 containing that text.

To search in specific folders, you would use the In: drop down menu and select “Folders”. You will then see a box to choose the folder you wish to search in.

Barracuda Standalone Tool

  1. In Windows, click the Start button, choose All Programs and then Barracuda Message Archiver Search.
  2. You will get the same login and search window as in the section above. Enter your search parameters as before.

Barracuda Archiver Web Interface

  1. To access the Barracuda Archiver Web interface, go to https://archiver.virginiawestern.edu.
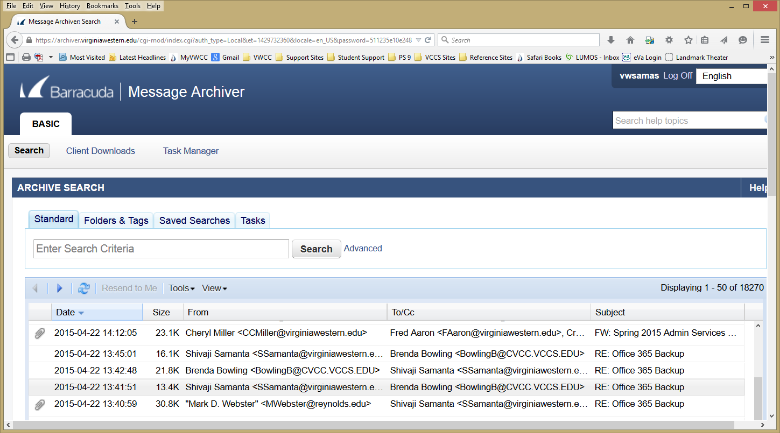
  2. Log in with your Virginia Western username and password. Once logged in, you will see the message list window.
    barracuda web interface
  3. Enter your Search criteria and click Search. The Advanced option will let you search with multiple criteria and specify folders to search in.

Barracuda Archiver Smartphone App

  1. Go to your iOS or Android app store and search for Barracuda Archive and download the app.
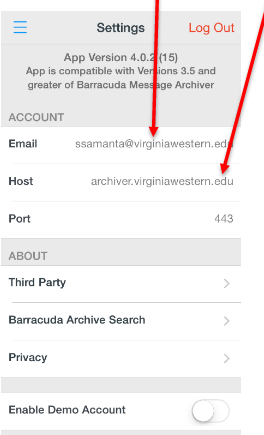
  2. Configure the app by setting the Host to archiver.virginiawestern.edu and using your Virginia Western email and password to log in.
    barracuda mobile setup
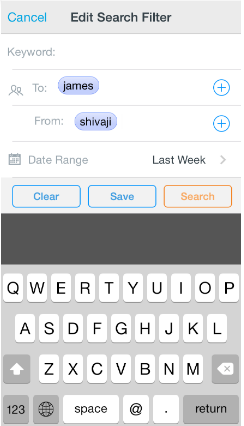
  3. Click the Search Icon (barracuda search icon) in the top right corner to open the search window. You can search the archive by keyword, to, from, and date range.
    Barracuda Mobile search filter

Tips for Reducing Spam

Follow these guidelines to lower your risk of receiving junk email!

  1. Take advantage of the Junk Email Filter in Outlook and Office 365 Webmail. Outlook and Office 365 webmail help mitigate the problem of spam by providing a Junk Email filter, which automatically evaluates incoming messages and sends those identified as spam to the Junk Email folder.
  2. Block pictures in HTML messages that spammers use as Web beacons. Outlook has an additional anti-spam feature. By default, this feature blocks automatic picture downloads and other external content in messages if the content is linked to another server. When this feature is turned off, if you open a message that has external content, that content downloads automatically, inadvertently verifying to the sender that your email address is valid. Your email address can then be sold to a spammer. You can unblock external content for messages that come from sources you trust.
  3. Turn off read and delivery receipts and automatic processing of meeting requests. Spammers sometimes resort to sending meeting requests and messages that include requests for read and delivery receipts. Responding to such meeting requests and read receipts might help spammers verify your email address. You can turn off tracking by:
    1. On the File menu, click Options.
    2. Click Mail, and then scroll down to the Tracking section.
    3. Uncheck any options you no longer wish to use.
  4. Limit the places where you post your email address. Be cautious about posting your email address on public web sites, such as newsgroups, chat rooms, bulletin boards, and so forth. When visiting public sites, you might want to use an email address that is different than your main email address. Whenever you list or link to your email address, you increase your chances of being spammed. Emails addresses on the VWCC website are masked in a way to prevent them being harvested by spammers.
  5. Review the privacy policies of web sites. When you sign up for online banking, shopping, or newsletters, review the privacy policy of the site carefully before you reveal your email address or other personal information. Look for a link or section (usually at the bottom of the web site’s home page) called “Privacy Policy”, “Privacy Statement”, “Terms and Conditions”, or “Terms of Use”. If the web site does not explain how your personal information will be used, consider not using the services at that site.
  6. Watch out for check boxes that are already selected. When you shop online, companies sometimes add a check box that is already selected, which indicates that it is fine with you if the company sells or gives your email address to other businesses (or “third parties). Clear this check box so that your email address is not shared.
  7. Don’t reply to spam. Never replay to an email message — even to subscribe from a mailing list — unless you know and trust the sender. For example, if the email address comes from a service, online store, or newsletter that you know you have signed up with. Answering spam just confirms to the spammer that your email address is an active one.
  8. If a company uses email messages to ask for personal information, don’t respond by sending a message. Most legitimate companies will not ask for personal information to be sent in an email. Be suspicious if they do. Such a request could be a spoofed email message disguised to look like a legitimate one. This tactic is known as phishing. If the possible spam appears to be sent by a company that you do business with — for example, your credit card company — then call the company to verify that they sent it (not using a phone number provided in the email). If the request is a legitimate one, the company’s customer service representative should be able to assist you. The Junk Email filter also includes phishing protection to help identify and disable suspicious messages.
  9. Don’t contribute to a charity in response to a request sent in email. Unfortunately, some spammers prey on your good will. If you receive an email appeal from a charity, treat it as spam. If the charity is one you want to support, locate their telephone number or web site to find out how you can make a contribution.
  10. Don’t forward chain email messages. Besides increasing overall email volume, forwarding a chain email message might be furthering a hoax — and meanwhile, you lose control over who sees your email address.