Below the Sign In button, click the Forgot Username link.
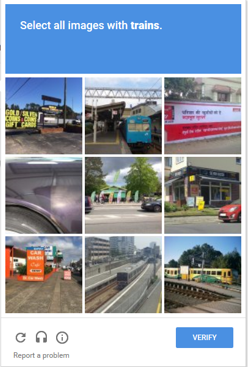
In the Password Reset box, click the checkbox next to “I’m not a robot”. Some users will be prompted with an image selector. You should select the images requested and then click Verify. When the process is completed successfully, click the Continue button.
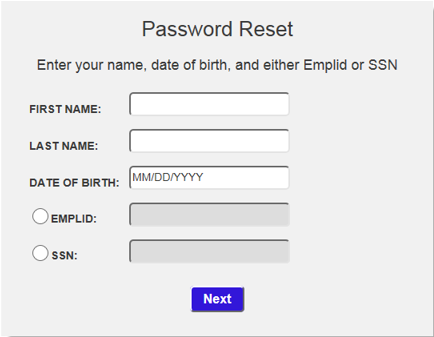
Enter your name, date of birth, and either your Emplid (Student ID Number) or SSN (Social Security Number) and click Next.
If the information you enter conflicts with existing information in the Student Information System, you will receive a message instructing you to contact the Help Desk for assistance.
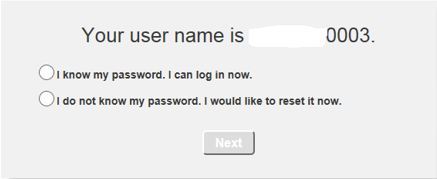
If the information you enter matches the information in the Student Information System, you will receive a message with your username and the option to either log in or reset your password. If you need to reset your password, click the radio button next to “I do not know my password. I would like to reset it now.” and click Next.
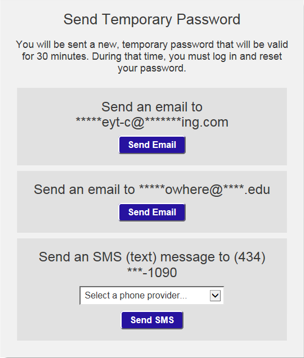
You will see the following screen if an alternate email (an email address that isn’t @email.vccs.edu) and/or a phone number are listed for you in SIS.
Choose the option by which you wish to receive your temporary password. If you are choosing the SMS (text message) option, please use the dropdown to select your phone provider. Click the Send option for the method you choose.
Note: If the email address(es) or phone number(s) presented are not valid options, you should contact the Help Desk for assistance.
Note: If no alternative email address or phone number exist in SIS, you will need to Verify Your Identity.
You will be sent a temporary password via your chosen method. This password is valid for 30 minutes, so you should log in right away in order to change it.
By using the ADV report, students and advisors can assess academic progress towards graduation. Students and advisors can also run what-if reports to simulate a different academic plan and the student’s progress towards that plan.
To create either of these reports, you must be logged into MyVWCC and inside the Student Information System. Click the Advisor Center link.
Creating an ADV Report
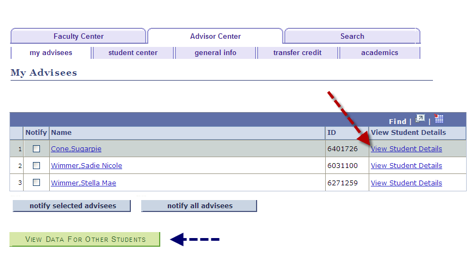
On the my advisees screen, click the View Student Details link located to the right of the student’s ID number.
An ADV can be run for a student who is not your advisee by clicking the button. You will need the student’s ID number.
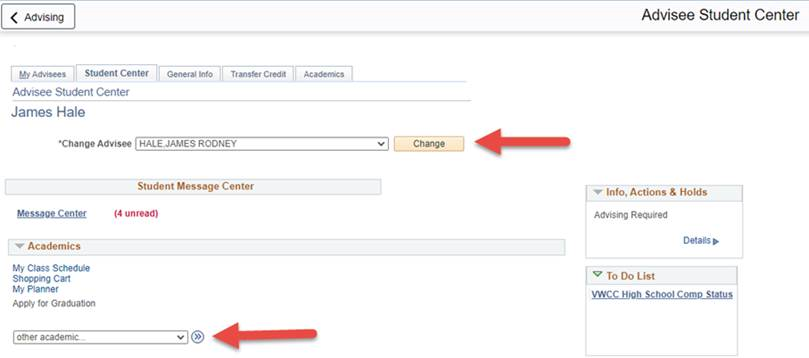
On the Student Details screen, click the other academic… dropdown and select Academic Requirements. Click the button.
The advisee’s requirements (ADV Report) will be displayed. To print the ADV report, click View Report as PDF.
Creating a What-If Report
On the my advisees screen, click the View Student Details link located to the right of the student’s ID number.
A What-If Report can be run for a student who is not your advisee by clicking the button. You will need the student’s ID number.
On the Student Details screen, click the other academic… dropdown and select What-if Report. Click the button.
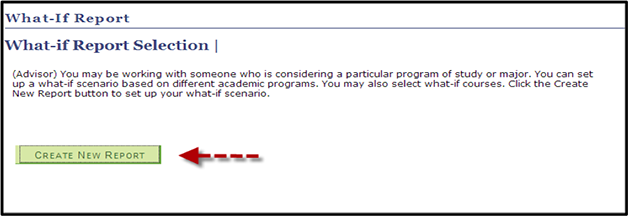
On the What-If Report screen, click the Create New Report button.
Under Career Scenario, select the Institution, Career, and Catalog Year.
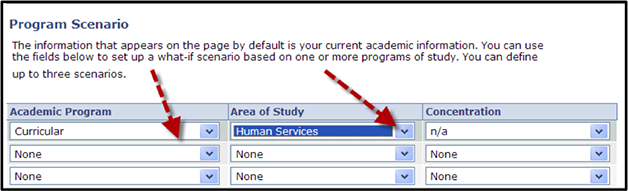
Under Program Scenario, select the Academic Program of Curricular. Use the Area of Study drop-down menu to select the plan for the What-if Report. Note: Only plan descriptions are displayed for selection on the Area of Study drop-down. This may be confusing if you have an associate degree plan that is named the same as a certificate or career studies plan (ex: Culinary Arts).
Click the Submit Request button at the bottom of the screen. The What-if Report will be displayed. To print the report, click View Report as PDF.
Students that are assigned to a faculty advisor in SIS are able to see their advisor’s name, preferred phone number, and email via the Student Center. Because of this, it is important to be sure that your Preferred Phone Type in SIS is the Business Phone Type.
To change your preferred phone type, you must be logged into MyVWCC and inside the Student Information System.
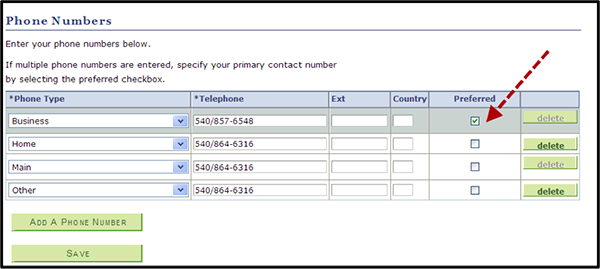
In the Student Center, click the Main Phone link under Personal Information.
On the Phone Numbers page, make sure the Preferred checkbox for the Business phone type is checked, then click Save.
Advisors can use the Advisor Center to contact their advisees via email. To view the Advisor Center, you must be logged into MyVWCC and inside the Student Information System. Click the Advisor Center link.
Click my advisees. This screen will display the advisees assigned to you.
To notify individual advisees, click the Notify checkbox to the left of the advisee’s name and then click the notify selected advisees button (). If you wish to notify all of your advisees, click the notify all advisees button ().
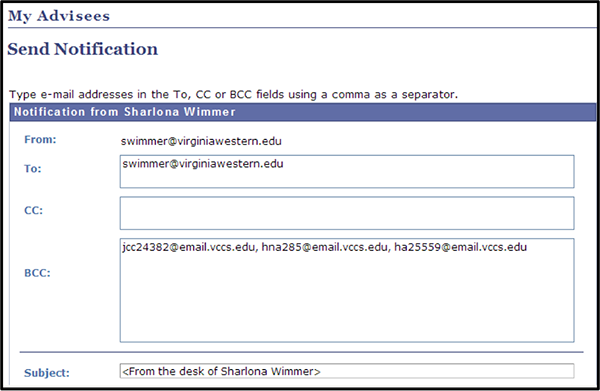
The Send Notification page will be displayed. Use this page to enter the information you wish to send.
When you are finished, click the Send Notification button ().
New students are assigned an advisor when they apply to the college for a program of study. Currently enrolled students with undeclared majors are assigned a faculty advisor once they declare a program of study. Advisor assignments are made by a nightly program that assigns advisors to students based on their major and who are currently enrolled and who do not have an existing advisor.
I Have Too Many Advisees!
When looking at your list of advisees, it may appear that you have a large number of them, but keep in mind that not all of those are enrolled. Although the advisee is assigned to you that doesn’t mean that the advisee is enrolled. The advisee stays on the advisor’s list of advisees until they are no longer active or they change their plan of study or graduate.
I Don’t Have Any Advisees!
For the health tech plans (like 156), the advisor is assigned when the student changes from the 156-01 (pre-admission) to the actual plan 156 and enrolls in classes. Returning nursing students will already have an advisor and new nursing students are assigned the advisor when their plan changes. Depending on when you were hired in this cycle, you may not have any advisees until the new nursing students are admitted for the next fall semester or if one of the current health tech advisors leaves Virginia Western employment.
Not having any advisees does not prevent you from meeting with and advising students.
Student’s assigned advisors can be found on the Student’s Student Center page within the Student Information System (SIS).
The Advisor Center presents advising faculty with a limited view of the advisee’s Student Center page. Additionally, advising faculty will have access to the student’s general information, transfer credit, and academics. Documentation on how to run an Advisement Report (ADV) and What If Report can be found on the Reports for Student Advisement page.
Note: Adjunct faculty do not have access to the Advisor Center.
Advisor Center Pages
To view the Advisor Center, you must be logged into MyVWCC and inside the Student Information System. Click the Advisor Center link.
My Advisees Page
The my advisees page displays the advisees assigned to the advisor in SIS. Advisors may also use the View Data for Other Students button () to access data for students not assigned to the advisor.
Field Descriptions
Notify: Check this box to send an email notification to the advisee.
Name: Advisee’s name from Bio-Demo data.
ID: Advisee’s Student ID.
View Student Details: Click this link to access the data available to advisors.
Notify selected advisees: Allows an email to be sent to the advisees with a check mark in the Notify column.
Notify all advisees: Allows an email to be sent to all advisees assigned to the advisor.
: Click this button to search for the ID of an advisee that is not currently assigned to the advisor in SIS.
View Student Details
This link takes the advisor to a limited view of the advisee’s Student Center. Notice that tabs are also available for General Info, Transfer Credit, and Academics. This link is also used to access the page for creating a student’s ADV report. Each will be detailed below.
Note: The same student information is available when using . If using this option, you will need the student’s ID number.
Student Center Page
Field Descriptions
Change Advisee: Allows the Advisor to quickly choose another advisee from the list of students assigned to the advisor. After choosing a new advisee, click the Change button.
Academics: This area allows the advisor to view the student’s class schedule, shopping cart, and planner. To view Academic Requirements (or Advising Report), course history, exam schedule, grades, unofficial transcript or transfer credit report, use the dropdown menu.
Personal Information: Allows the advisor to view the demographic data, emergency contact data, and contact data for the student.
Holds: Allows the advisor to view any holds (service indicators) on the student.
To Do List: Allows the advisor to view any checklists applied to the student.
Enrollment Dates: Allows the advisor to view the enrollment dates for the term if the student is term activated.
Advisor: Displays the Advisor(s) assigned to the student.
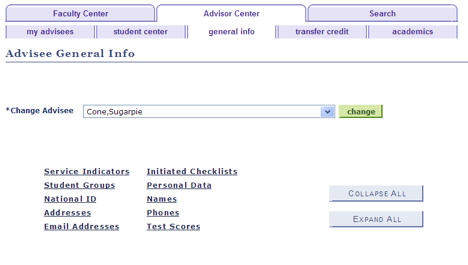
General Information Page
The default view for the General Information page is that all sections are expanded. Individual sections can be expanded or collapsed by clicking the green arrows, or all sections can be expanded or collapsed by clicking the Collapse All or Expand All buttons.
Field Descriptions
Service Indicators: Displays any service indicators active for the student.
Initiated Checklists: Displays any checklists that have been initiated for the student.
Student Groups: Displays any student groups assigned to the student.
Personal Data: Displays date of birth, gender, and marital status.
National ID: Displays the last four digits of the student’s social security number.
Names: Displays the Primary and Preferred names for the student.
Addresses: Displays any addresses for the student.
Phones: Displays any phone numbers for the student, with the preferred number marked.
Email Addresses: Displays any email addresses for the student with the preferred address marked.
Test Scores: Redirects the page to display test score results.
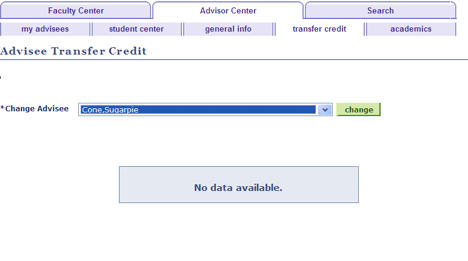
Transfer Credit Page
Field Descriptions
Course Credits: Displays information about credits granted for courses taken at other institutions. Click this symbol () to display all the columns available.
Test Credits: Displays information about credits granted for test scores. Click this symbol () to display all the columns available.
Other Credits: Displays information about other credits granted to the student, such as advanced standing credits, etc. Click this symbol () to display all the columns available.
Academics Page
Field Descriptions
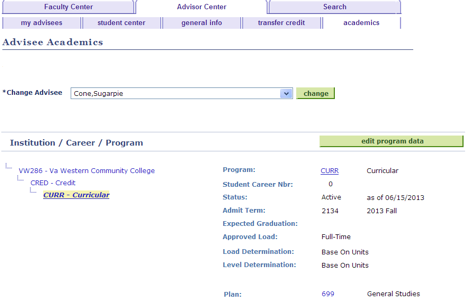
Institution/Career/Program: Displays the school, career, and program information for the student. Note that for students at multiple schools, each school is displayed.
Term Summary: Displays the term(s) that the student has been term activated for the given school. You may also view the student’s classes by term and term statistics.
: This message is displayed for users that do not have security access to the pages from which the data is pulled.
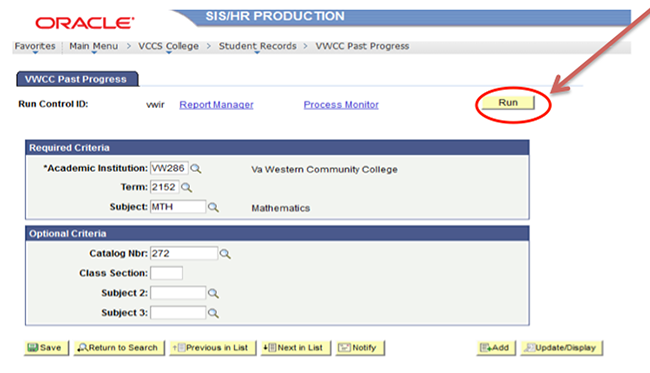
To access a Past Progress Report, you must be logged into MyVWCC and inside the Student Information System.
In the top right corner, click the Home link. This will take you to the VCCS College page.
In the Student Records box, scroll down until you find VWCC Past Progress and click the link.
If you have used the system before, enter your Run Control ID and select Search. If you have not used the system previously, click on the Add a New Value tab.
On the next screen, create a Run Control ID and select Search. Use a Run Control ID you can remember, such as “vw” followed by your department or initials.
Enter the specific course information you would like included in the report. You must enter information into the top three fields. The bottom fields are optional. Then click Run.
Required information:
Academic Institution: VW286
Term: Examples – For Spring 2017, use 2172; For Summer 2017, use 2173; For Fall 2017, use 2174
Subject: Enter the three letter subject code for the course you want to check the prerequisites for (such as MTH). This will show all MTH prerequisites on the MTH courses you select.
Optional Information:
Catalog Number: The 3 digit catalog number (such as 272 for MTH 272)
Class Section: Enter the class section if you only want to pull one section of data
Subject 2 and Subject 3: List additional 3 letter subject codes that are also prerequisites. For example, if a MTH class had a MTH prerequisite and an EGR prerequisite, adding EGR as subject 2 would pull the EGR and the MTH prerequisites for the MTH course.
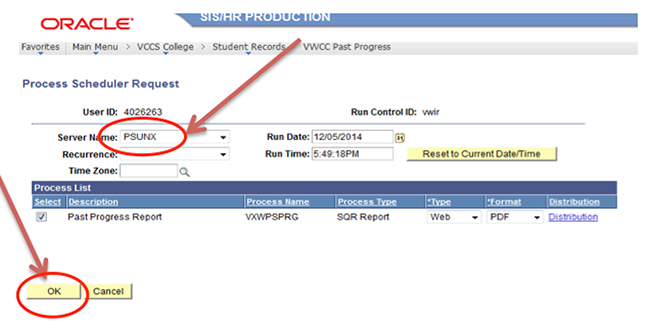
Make sure USERID is PSUNX and click OK.
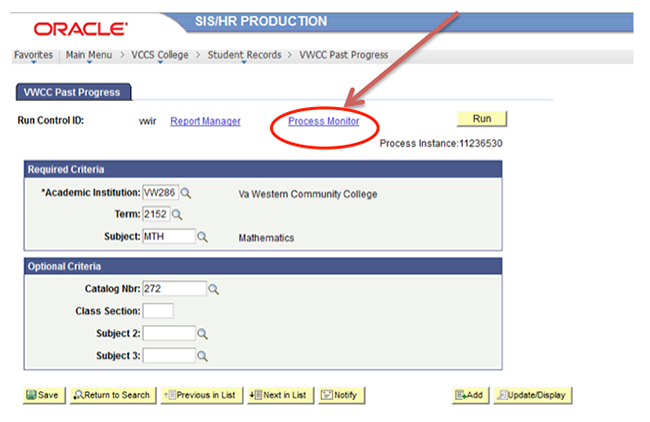
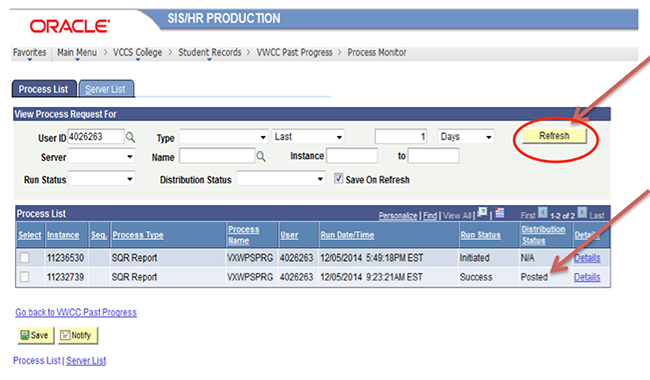
Click on the Process Monitor link.
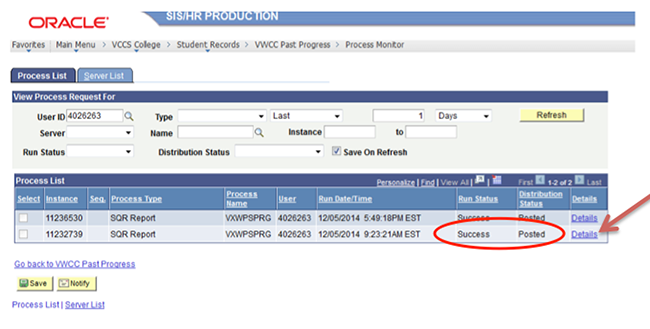
Click on Refresh until the Distribution Status says Posted. It may take several minutes depending on how many classes you run at one time.
Click on Details.
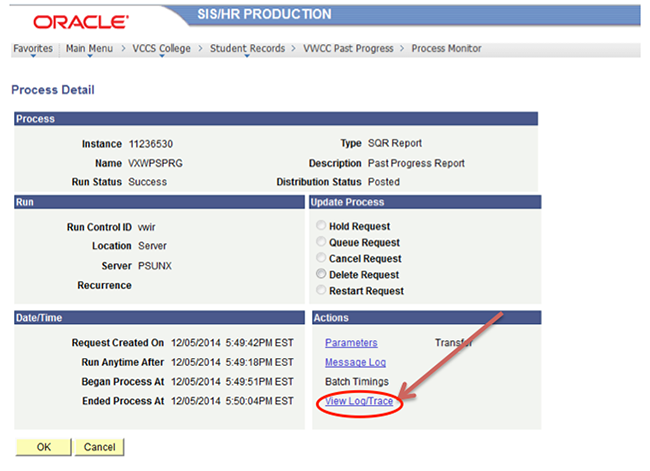
Click on View Log/Trace.
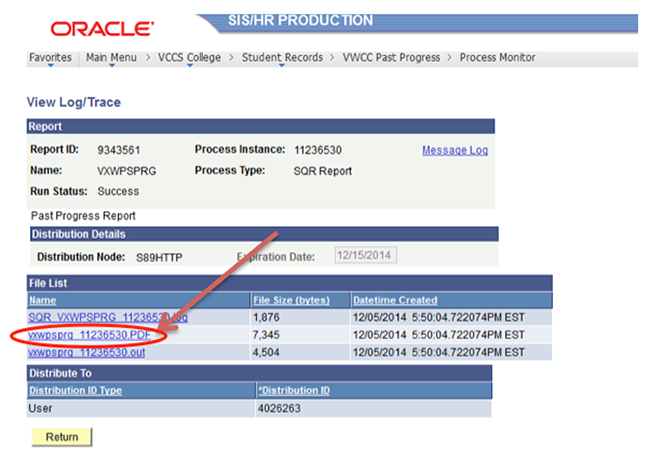
Click on the middle link that ends in .PDF.
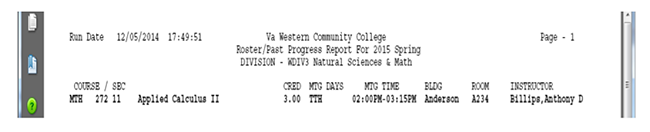
A PDF file will open, or you will be prompted to download it. The first few lines will look like this:
To access a roster with DEV ENG History Report, you must be logged into MyVWCC and inside the Student Information System.
In the top right corner, click the Home link. This will take you to the VCCS College page.
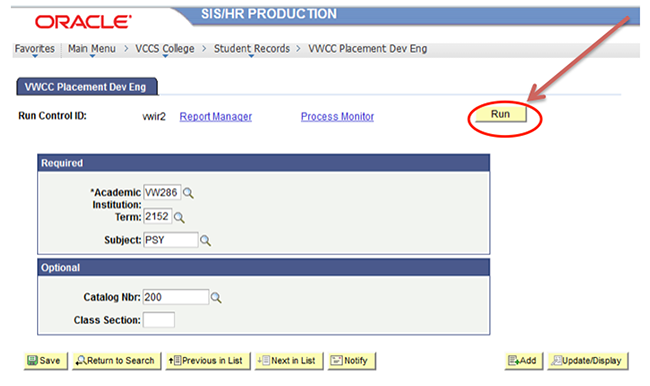
In the Student Records box, scroll down until you find VWCC Placement Dev ENG and click the link.
If you have used the system before, enter your Run Control ID and select Search. If you have not used the system previously, click on the Add a New Value tab.
On the next screen, create a Run Control ID and select Search. Use a Run Control ID you can remember, such as “vw” followed by your department or initials.
Enter the specific course information you would like included in the report. You must enter information into the top three fields. The bottom fields are optional. Then click Run.
Required information:
Academic Institution: VW286
Term: Examples – For Spring 2017, use 2172; For Summer 2017, use 2173; For Fall 2017, use 2174
Subject: Enter the three letter subject code for the course you want to check the prerequisites for (such as PSY). This will show all developmental ENG prerequisites on the PSY courses you select.
Optional Information:
Catalog Number: The 3 digit catalog number (such as 200 for PSY 200)
Class Section: Enter the class section if you only want to pull one section of data
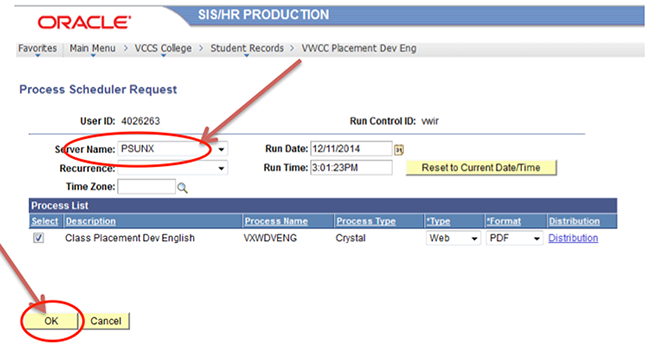
Make sure USERID is PSUNX and click OK.
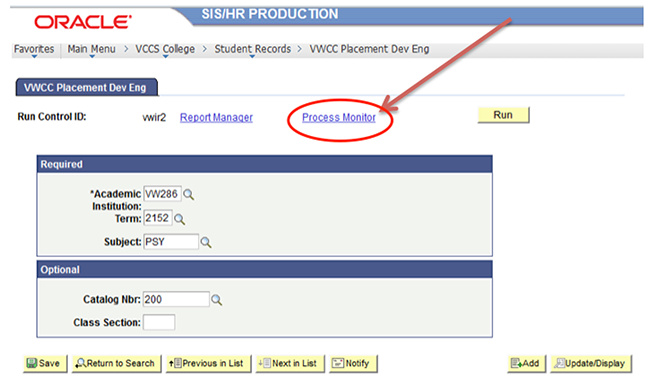
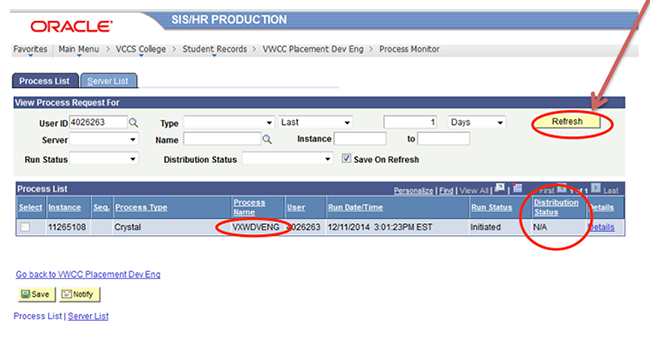
Click on the Process Monitor link.
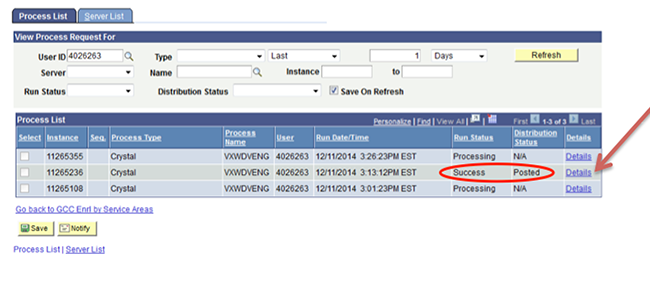
Click on Refresh until the Distribution Status says Posted. It may take several minutes depending on how many classes you run at one time.
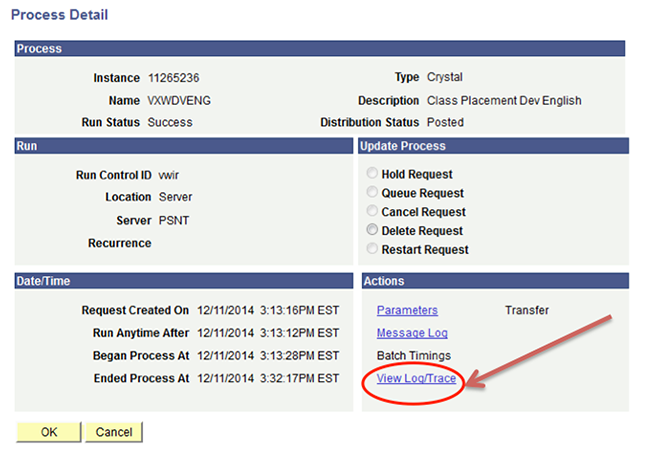
Click on Details.
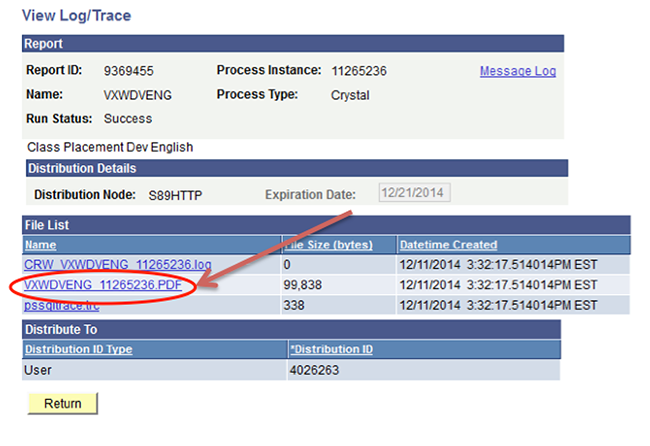
Click on View Log/Trace.
Click on the middle link that ends in .PDF.
A PDF file will open, or you will be prompted to download it. The first few lines will look like this:
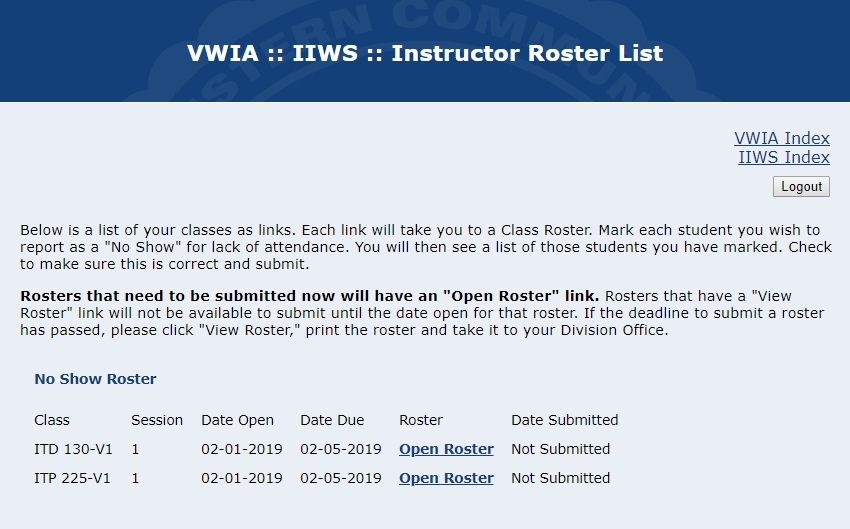
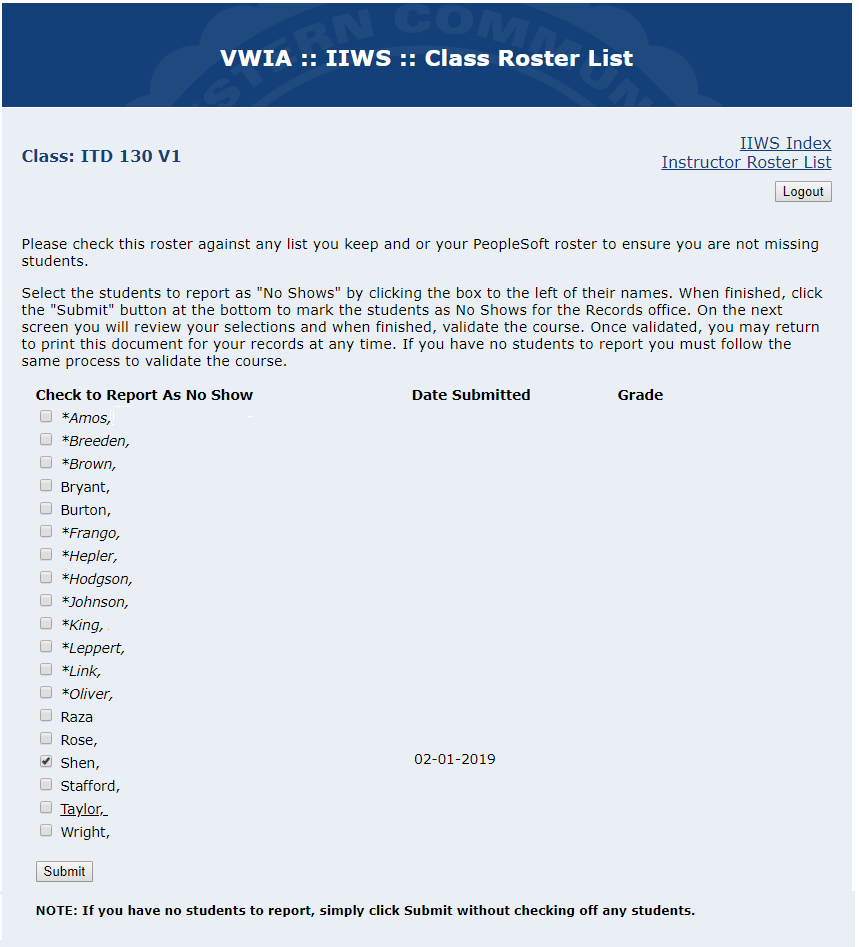
Click on the Go To My Rosters link. Rosters that have a “View Roster” link will not be available to submit until the date open for that roster. If the deadline to submit a roster has passed, click View Roster, print the roster from the IIWS system using the browser print option, and take it to your Division Office. Rosters that have been submitted will have the date of submission.
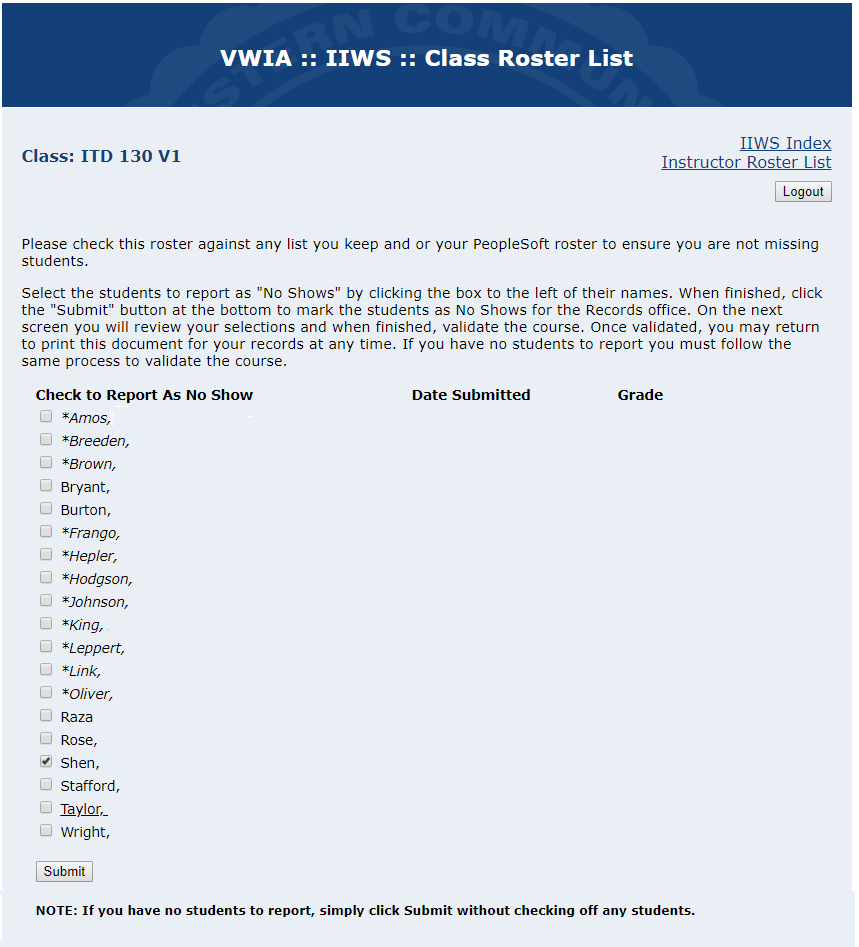
When you open the roster for a course, you will see a list of your students. This list of students matches enrollment information in the Student Information System (SIS), so this is an accurate record of the students enrolled in your class. If you have no students to report, simply click the submit button. If you have students you wish to report, select the box next to their name and then submit.
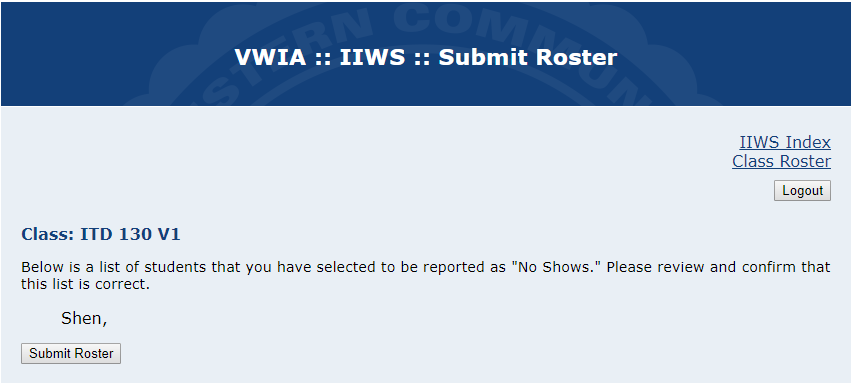
If you selected any students, you will see them listed on the next screen. If you did not select any students, you will not see any students listed. In either scenario, you must click the Submit Roster button to submit this roster.
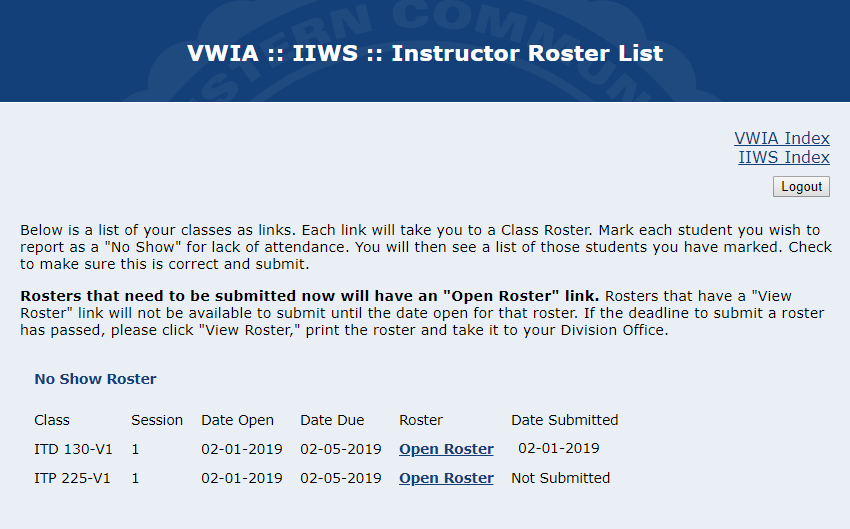
Upon completion, you will see your list of rosters and the date submitted (if applicable).
If you would like to verify the information submitted, select Open Roster to verify the results. The date you submitted the report will be noted.
Important Things to Note
You have until the Roster Due Date to go back and add or remove students from the no-show list. This date is listed on your roster page.
If you miss a deadline you will need to print your rosters from IIWS, mark any no-shows, and submit the information to your Division Office.
If you have trouble logging into the system or any other issues, please contact jobrequest@virginiawestern.edu with the email subject line “IIWS”.
Because of issues we have identified with enrollment reporting, as of February 14, 2019 faculty will no longer submit withdrawal rosters.
Virginia Western’s Instructor Initiated Withdrawal System (IIWS) is an electronic system of validating student attendance/participation for purposes of complying with federal reporting guidelines. This system is designed for faculty to report non-attendance for two reporting periods: no-show reporting and withdrawal reporting.
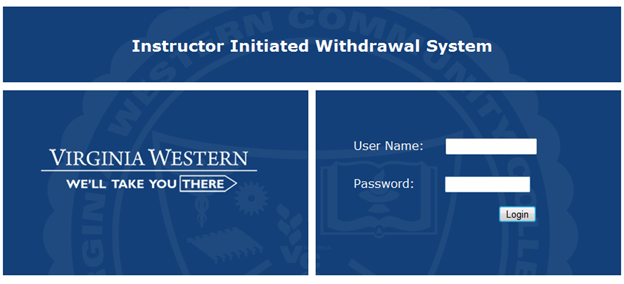
Enter the Instructor Initiated Withdrawal System via https://apps.virginiawestern.edu/vwia/. This link is also available in the Faculty/Staff menu on the Virginia Western web site and on the Faculty & Staff Resources page.
On the login page, enter your MyVWCC username and password and click Login.