Create a Shortcut to a File on the Network

Do you save files to your workstation desktop? Are these files safe and secure?

The desktop on your computer should only be used for shortcuts to documents you have already saved on the Virginia Western network. Files saved to your desktop could be lost if your computer has to be reimaged, and these files are not backed up.

When using a networked Virginia Western computer, you should always save your files to your I: drive or your shared departmental J: drive. Each employee who has requested access to Virginia Western’s network is given network storage space. This space is backed up nightly.

To create a shortcut to a saved network file:

  1.  In Windows, right-click on the Start button and choose Open Windows Explorer.
  2. Locate the file, which should be on your I: or J: drive.
  3. Right-click on the file, then choose Send To and then Desktop (create shortcut).

A shortcut icon for the file will now be on your desktop, but the file itself will still be saved on your networked drive.

How to Clear a Printer Jam

First, observe the message on the printer display — this often indicates the area of the jam.

Following are places to check after observing the message. If the message does not indicate the area of the jam, check each area until it is located.

  • Check the top of the printer by lifting the top cover accessible from the front of the printer. Look inside with the lid open to see if paper is partially pulled up into the printer. If so, gently pull it out.
  • The print cartridge may be lifted out carefully. If paper is lodged in the paper path, gently remove it.
  • Each tray may be removed. Ensure that paper is seated in the tray. Look inside after removing the tray to see if paper is partially pulled up into the printer. If so, gently pull it out.
  • Jams may occur in the duplexer unit in the rear of the printer. This can be removed easily.

If these areas have been checked and there is still a problem, contact the Help Desk at 7-7354 and report the problem.

Searching for Emails Using Barracuda Archive Tools

There are four options for searching for emails using Barracuda Archive Tools.

Barracuda Plugin for Outlook

Note: This option is not available for Office 365 Webmail. Please use one of the other options below.

  1. In the Outlook client, select the Home tab and look for the Barracuda Networks section in the upper right hand corner of the screen.
    outlook toolbar
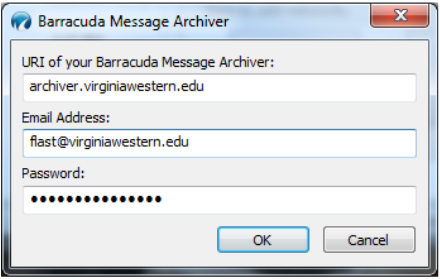
  2. Choose Search Archive. The first time you do this, a login box will appear. If prompted for the URI, enter archiver.virginiawestern.edu. Use your email credentials to log in.
    barracuda message archiver setup
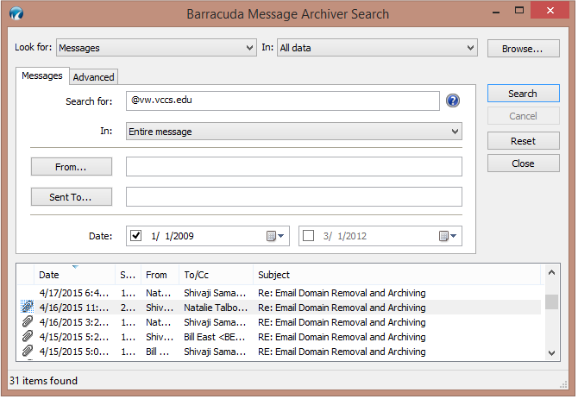
  3. The Search box will appear. Use the available options to search for the email you are looking for.
    barracuda message archiver search

You can search your archived mail by criteria you choose, such as text, dates, folder locations, and so on. For example, to deal with the scheduled removal of the @vw.vccs.edu domain, you would locate the senders who are still using your old email address by searching for @vw.vccs.edu as shown above. The search output window would display all email received after January 1, 2009 containing that text.

To search in specific folders, you would use the In: drop down menu and select “Folders”. You will then see a box to choose the folder you wish to search in.

Barracuda Standalone Tool

  1. In Windows, click the Start button, choose All Programs and then Barracuda Message Archiver Search.
  2. You will get the same login and search window as in the section above. Enter your search parameters as before.

Barracuda Archiver Web Interface

  1. To access the Barracuda Archiver Web interface, go to https://archiver.virginiawestern.edu.
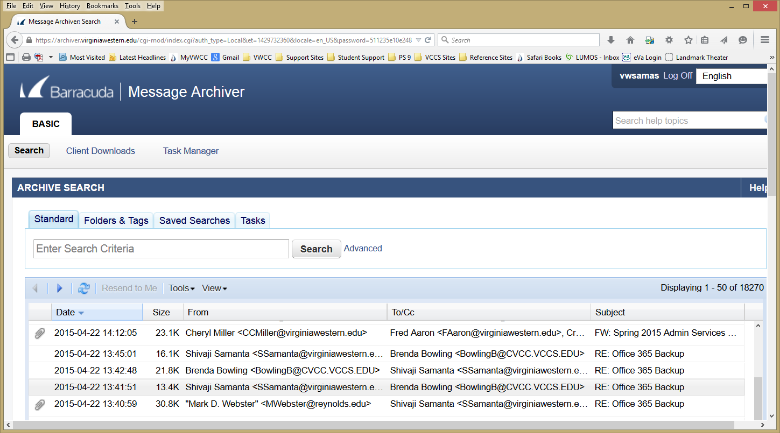
  2. Log in with your Virginia Western username and password. Once logged in, you will see the message list window.
    barracuda web interface
  3. Enter your Search criteria and click Search. The Advanced option will let you search with multiple criteria and specify folders to search in.

Barracuda Archiver Smartphone App

  1. Go to your iOS or Android app store and search for Barracuda Archive and download the app.
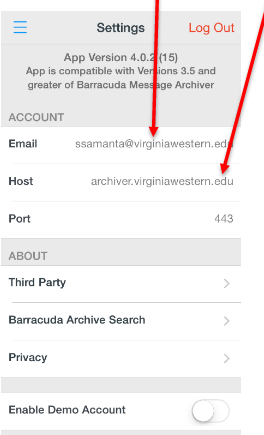
  2. Configure the app by setting the Host to archiver.virginiawestern.edu and using your Virginia Western email and password to log in.
    barracuda mobile setup
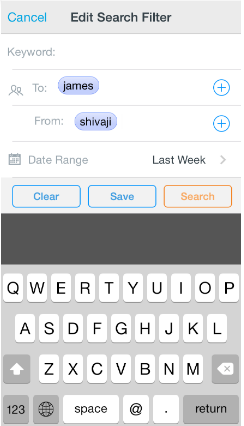
  3. Click the Search Icon (barracuda search icon) in the top right corner to open the search window. You can search the archive by keyword, to, from, and date range.
    Barracuda Mobile search filter

Tips for Reducing Spam

Follow these guidelines to lower your risk of receiving junk email!

  1. Take advantage of the Junk Email Filter in Outlook and Office 365 Webmail. Outlook and Office 365 webmail help mitigate the problem of spam by providing a Junk Email filter, which automatically evaluates incoming messages and sends those identified as spam to the Junk Email folder.
  2. Block pictures in HTML messages that spammers use as Web beacons. Outlook has an additional anti-spam feature. By default, this feature blocks automatic picture downloads and other external content in messages if the content is linked to another server. When this feature is turned off, if you open a message that has external content, that content downloads automatically, inadvertently verifying to the sender that your email address is valid. Your email address can then be sold to a spammer. You can unblock external content for messages that come from sources you trust.
  3. Turn off read and delivery receipts and automatic processing of meeting requests. Spammers sometimes resort to sending meeting requests and messages that include requests for read and delivery receipts. Responding to such meeting requests and read receipts might help spammers verify your email address. You can turn off tracking by:
    1. On the File menu, click Options.
    2. Click Mail, and then scroll down to the Tracking section.
    3. Uncheck any options you no longer wish to use.
  4. Limit the places where you post your email address. Be cautious about posting your email address on public web sites, such as newsgroups, chat rooms, bulletin boards, and so forth. When visiting public sites, you might want to use an email address that is different than your main email address. Whenever you list or link to your email address, you increase your chances of being spammed. Emails addresses on the VWCC website are masked in a way to prevent them being harvested by spammers.
  5. Review the privacy policies of web sites. When you sign up for online banking, shopping, or newsletters, review the privacy policy of the site carefully before you reveal your email address or other personal information. Look for a link or section (usually at the bottom of the web site’s home page) called “Privacy Policy”, “Privacy Statement”, “Terms and Conditions”, or “Terms of Use”. If the web site does not explain how your personal information will be used, consider not using the services at that site.
  6. Watch out for check boxes that are already selected. When you shop online, companies sometimes add a check box that is already selected, which indicates that it is fine with you if the company sells or gives your email address to other businesses (or “third parties). Clear this check box so that your email address is not shared.
  7. Don’t reply to spam. Never replay to an email message — even to subscribe from a mailing list — unless you know and trust the sender. For example, if the email address comes from a service, online store, or newsletter that you know you have signed up with. Answering spam just confirms to the spammer that your email address is an active one.
  8. If a company uses email messages to ask for personal information, don’t respond by sending a message. Most legitimate companies will not ask for personal information to be sent in an email. Be suspicious if they do. Such a request could be a spoofed email message disguised to look like a legitimate one. This tactic is known as phishing. If the possible spam appears to be sent by a company that you do business with — for example, your credit card company — then call the company to verify that they sent it (not using a phone number provided in the email). If the request is a legitimate one, the company’s customer service representative should be able to assist you. The Junk Email filter also includes phishing protection to help identify and disable suspicious messages.
  9. Don’t contribute to a charity in response to a request sent in email. Unfortunately, some spammers prey on your good will. If you receive an email appeal from a charity, treat it as spam. If the charity is one you want to support, locate their telephone number or web site to find out how you can make a contribution.
  10. Don’t forward chain email messages. Besides increasing overall email volume, forwarding a chain email message might be furthering a hoax — and meanwhile, you lose control over who sees your email address.

MyVWCC Advanced Password Reset Tool

If you do not know your MyVWCC username, you will need to use the Advanced Password Reset Tool to look it up.

  1. Go to MyVWCC (https://vw.my.vccs.edu).
  2. Below the Sign In button, click the Forgot Username link.
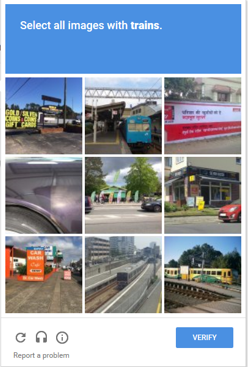
  3. In the Password Reset box, click the checkbox next to “I’m not a robot”. Some users will be prompted with an image selector. You should select the images requested and then click Verify. When the process is completed successfully, click the Continue button.
    Example Captcha Image

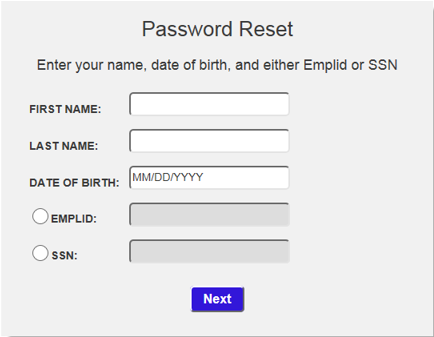
  4. Enter your name, date of birth, and either your Emplid (Student ID Number) or SSN (Social Security Number) and click Next.
    password reset box
  5. If the information you enter conflicts with existing information in the Student Information System, you will receive a message instructing you to contact the Help Desk for assistance.
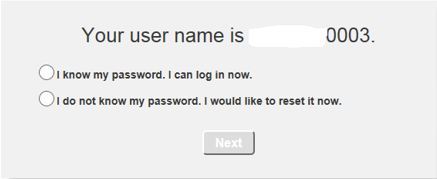
  6. If the information you enter matches the information in the Student Information System, you will receive a message with your username and the option to either log in or reset your password. If you need to reset your password, click the radio button next to “I do not know my password. I would like to reset it now.” and click Next.
    password reset with username
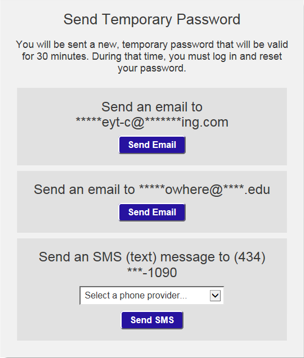
  7. You will see the following screen if an alternate email (an email address that isn’t @email.vccs.edu) and/or a phone number are listed for you in SIS.
    password reset results
  8. Choose the option by which you wish to receive your temporary password. If you are choosing the SMS (text message) option, please use the dropdown to select your phone provider. Click the Send option for the method you choose.
    • Note: If the email address(es) or phone number(s) presented are not valid options, you should contact the Help Desk for assistance.
    • Note: If no alternative email address or phone number exist in SIS, you will need to Verify Your Identity.
  9. You will be sent a temporary password via your chosen method. This password is valid for 30 minutes, so you should log in right away in order to change it.

Security Access Termination

In order to comply with VCCS security audit procedures, all terminated employees that had access to the college’s information systems (including email) must be removed within 24 hours after termination. Departments/divisions that have terminated a faculty or classified staff’s employment must complete a Deletion SARF and then notify Human Resources immediately.

The Deletion SARF can be found on VWConnect (on-campus or virtual desktop access only), under links on the right side of the screen. If you believe you should have access but do not see the link, please contact the Help Desk.

Security Access Request Form (SARF)

The SARF is the college’s Security Access Request Form. This form is used to request computer and phone access for employees.

The following systems can be accessed by completing a SARF:

  • Faculty/Staff Email
  • VWCC Network
  • D-list accounts
  • Shared email accounts
  • Phone access
  • Peoplesoft/Student Information System (faculty and administrative)
  • VITA (CARS, BES, DMV, CIPPS, FINDS, and PMIS)
  • AIS
  • Pcard
  • eVA
  • WES

When should the SARF be completed?

The SARF can take a few days to process depending on what access has been requested. A week beforehand is generally early enough to have most access set up by the time the employee begins work. Some access can only be set up once the employee’s start date has arrived. Please remember that Security Awareness Training will need to be completed 30 days within their account being set up, so it is not advised to request an account too early.

Where is the SARF located?

A link to the SARF can be found on VWConnect (on-campus or virtual desktop access only) on the right side of the page. If you believe you should have access but do not see the link, please contact the Help Desk.

Hints for Completion

  • Include as much of the employee’s information at the top of the form as possible. This information is used to populate the college’s online directory, so it should be accurate.
  • The SARF can be submitted without the EmplID if it is not known.
  • If an employee needs their own phone number and voicemail, make sure you click Yes for “Phone access needed?” and that “Voicemail is needed” is selected.
  • Do not select anything in the D-list email account list for a new employee. Secondary accounts are only allowed for existing employees.
  • When the SARF is submitted, make sure you do not have any errors. Errors are highlighted in red and the SARF will not be submitted successfully until all issues are resolved.
  • The Supervisor’s Name at the bottom of the SARF should not be the same as the name submitted at the top of the SARF.

Contact the Help Desk if you have specific questions about the form or access being given.

Setting Up Access for a New Employee

This guide is to be used by supervisors to set up a new employee with network access.

Does the new employee’s office have a computer and phone?

If Yes: If the room already has a computer and phone then you should complete a SARF (see below) so that access setup can begin.

If No: If there is not a computer and phone in the office, you should still complete a SARF (see below) but after completion you also need to contact the Help Desk and request a ticket be opened for a computer and phone install. Please inform the Help Desk that you have completed a SARF.

What is a SARF and how do I complete it?

The SARF is the college’s Security Access Request Form. This form is used to request computer and phone access for employees. For more information about the SARF, please refer to Security Access Request Form (SARF).

How do I know when my new employee’s access has been set up?

A “Welcome Email” will be sent to the employee’s VWCC email account along with a copy to the supervisor. As the supervisor, you should provide the employee with a copy of the email to assist in accessing their new accounts.

What is the K: drive and how does my employee get access?

The K: drive is a network drive that is available when using academic computers located in labs and classrooms. It allows both students and instructors to see the files without having access to edit them.

In order to access the K: drive, a user must log in to their administrative account. Contact the Help Desk if a folder needs to be created.

Is there any training for new employees?

Online New Employee Information Technology Orientation

IET has an online orientation available for new employees. The orientation can be accessed here. Please let the Help Desk know when orientation has been completed.

Security Awareness Training

As part of the Commonwealth of Virginia information security standards, employees are required to complete Security Awareness Training within 30 days of receiving their welcome email. Additional information can be found on our Security Awareness Training page.

How does my employee get access to a Virtual Desktop?

All faculty and staff have access to a virtual desktop. Using a virtual desktop allows access to VWCC cloud services such as mapped drives, printer access and VWConnect from anywhere. A virtual desktop can be accessed via a variety of end users devices, such as a thin client computer, desktop computer, iPad, iPhone, or other mobile devices. All VWCC owned computers have the hosted desktop VMWare View Client installed on them. For more information, refer to our Virtual Desktop page.

Clearing the Auto-Complete Email Address Cache in Outlook

Outlook has an automatic completion list for any email address that you try to type into the To or CC fields. This feature does not pull from the contacts or address book, because you may have tried to email somebody that isn’t in your contact list.

The problem arises when you put in a bad address, and then every time you go to type in the email address, the incorrect one appears in the auto-complete list.

To remove an email address from your auto-complete list:

  1. In the To: or CC: field, begin typing in the address that shows up incorrectly.
  2. A list of email addresses that match what you have typed will appear in a dropdown list below the field.
  3. Click the X next to the address you wish to delete.

How to Classify Quarantined Email Messages

If you receive a Spam Quarantine Summary email from Barracuda, follow the directions below to decide if you want to Deliver, Delete, Whitelist, Classify as Spam, etc.

  • Deliver: Delivers the selected message to your standard email box. Note: If you want to classify a message or add it to your whitelist, make sure to do so before delivering the message to your inbox. Once the Barracuda Spam firewall delivers a message, it is removed from your quarantine list.
  • Whitelist: Adds the selected message to your whitelist, so all future emails from this sender are not quarantined unless the message contains a virus or banned attachment type. The Barracuda Spam Firewall adds the sending email address exactly as it appears in the message to your personal whitelist.
  • Whitelist/Not Spam: Performs the functions of both Whitelist and Classify as Not Spam at the same time.
  • Delete: Deletes the selected message from your quarantine list. The main reason to delete messages is to help you keep track of which quarantine messages you have reviewed.
  • Classify as Spam: Classifies the selected message as spam.
  • Classify as Not Spam: Classifies the selected message as not spam. Note: Some bulk commercial email may be considered useful by some users and spam by others. Instead of classifying bulk commercial email, it may be more effective to add it to your whitelist (if you wish to receive such messages) or blacklist (if you prefer not to receive them).

When you receive a Spam Quarantine Summary email from Barracuda:

  1. If you would like to just delete all the messages, click the DELETE ALL DISPLAYED EMAILS link in the email. This will open a browser window, where the messages will be deleted.
  2. If you wish to more thoroughly classify the messages or inspect them further, click the View your entire Quarantine Inbox or manage your preferences link at the bottom of your email.
  3. Use the checkboxes next to each message or the links (Deliver, Whitelist, Delete) following each message to classify each message. You can use the checkboxes to select more than one message at a time.
  4. When you are finished, click the Log Off link in the upper right corner.

You will receive an email from Barracuda whenever you have messages that have been quarantined.

Please contact the Help Desk if you have any questions.