View Your Financial Aid

To view your financial aid, you must be logged into MyVWCC and inside the Student Information System.

  1. Click on your Student Information tile.
    SIS Student Home Screen
  2. In the Finances section, click View Financial Aid.
    Financial Aid link
  3. Click the desired Aid Year.
    Financial Aid Year

The award(s) you are viewing is a projection based upon your enrollment as a full-time student. Full-time students must be enrolled for 12 or more credits

Apply for Graduation Online

To apply for graduation, you must be logged into MyVWCC and inside the Student Information System.

  1. Click on your Student Information tile.
    SIS Student Home Screen
  2. In the Academics section, click on Apply for Graduation, or click Academic Records > Apply for Graduation from the left-hand menu.
  3. Verify all the information on the screen is correct. If it is not, you will need to complete a Notification of Change Form (PDF) and submit it to the Enrollment Center.
  4. If your information is correct, click Proceed with Making Application.
  5. Select your Institution. If you have multiple institutions listed, choose VW286 Va Western Community College.
  6. Select the Term. The only term available will be the current term, except during the time both the spring and summer applications are available for summer students who wish to participate in the Commencement Ceremony. In this case, make sure you choose the correct term for your graduation.
    Graduation term select
  7. Click Continue. All of the plans you are enrolled in will appear.
    graduation application degree
  8. Select any plans for which you are graduating from this term. In this example, the student is only graduating from one of their current plans.
    graduation application plan
    If this student was planning on graduating from both plans, both boxes would be checked.
    graduation application plans
    If the plan you wish to graduate from is not listed, check the box next to If the Degrees/Certificates you wish to apply for are not listed above, please check this box and complete a Program/Plan Change Form (PDF) to be submitted to your faculty advisor, program advisor, or through the Enrollment Center. You will be able to complete the graduation application, but it will NOT be processed until you submit the Program/Plan Change Form.
    graduation application add a plan
  9. Verify your name. The name that showed at the top of at the top of the graduation application is the name that will print on your diploma. Changing that information here will not reflect on your diploma. If this is not your current legal name, you will need to submit a Notification of Change Form (PDF) through the Enrollment Center.
    graduation application name
  10. In the Questionnaire and Military sections, check all options that apply.
    graduation application questionnaire
  11. If you are ready to submit your application, click the box next to I Agree. Once your application is submitted, it cannot be changed without speaking to the Records Office. Once you are ready, click Submit. You will receive a confirmation page.
    graduation application submit

After You Apply

If you have not met your requirements for graduation, your faculty or program advisor will contact you.

After the deadline for graduation has passed, you will receive an email in your student email account with detailed information regarding cap & gown pickup, the graduation ceremony, and diploma pickup. Information can also be found on the Graduation website.

View Your Unofficial Transcript

To view your unofficial transcript, you must be logged into MyVWCC and inside the Student Information System.

  1. Click on your Student Information tile.
    SIS Student Home Screen
  2. In the Academics section choose Unofficial Transcript from the drop-down menu and click on the blue button (Go button), or click Academic Records > View Unofficial Transcript from the left-hand menu.
    Menu - Unofficial Transcript
  3. Select Virginia Western Community College as the Academic Institution and Unofficial Transcript as the Report Type and click View Report.
    View Unofficial Transcript link
  4. You will be shown a list of all recent requests for reports, with the top one being the most recent. Click on the View Report button and it will open the file as a PDF, which you can either save or print for your records.
    Transcript list

View Your Grades

To view your grades, you must be logged into MyVWCC and inside the Student Information System.

  1. Click on your Student Information tile.
    SIS Student Home Screen 
  2. In the Academics section, choose Grades from the drop-down menu and click on the blue button (Go button), or click Academic Records > View My Grades from the left-hand menu.
    View My Grades Link
  3. If necessary, click Change Term, then select a term from the Select Term menu and click Continue.
    Your Grades

Your term statistics will be displayed below your grades.

View Your Transfer Credit Report

To view your transfer credit evaluation, you must be logged into MyVWCC and inside the Student Information System.

  1. Click on your Student Information tile.
    SIS Student Home Screen
  2. In the Academics section, choose Unofficial Transcript from the drop-down menu and click on the blue button (Go button), or click Academic Records > View Unofficial Transcript from the left-hand menu.
    Menu - Unofficial Transcript
  3. Select Virginia Western Community College as the Academic Institution and Transfer Credit Evaluation as the Report Type and click View Report.
    View Unofficial Transcript
  4. You will be shown a list of all recent requests for reports, with the top one being the most recent. Click on the View Report button and it will open the file as a PDF, which you can either save or print for your records.
    Unofficial transcript list

View Your Class Schedule

To view your class schedule, you must be logged into MyVWCC and inside the Student Information System.

  1. Click on your Student Information tile.
    SIS Student Home Screen
  2. In the Academics section, choose Class Schedule from the drop-down menu and click on the blue button (Go button), or click Enrollment > My Class Schedule from the left-hand menu.
    Link to class schedule
  3. You may choose from List View or Weekly Calendar View.
    Your Class Schedule

Using My Planner

My Planner allows you to plan your courses for one semester or for future semesters by searching the course catalog or by using the academic requirements for your degree. To ensure that the courses added to your Planner will satisfy your degree requirements, it is suggested that you use the Plan by Requirements option.

Note: The My Planner option is not the same as actual enrollment in a class, it is only a planning tool.

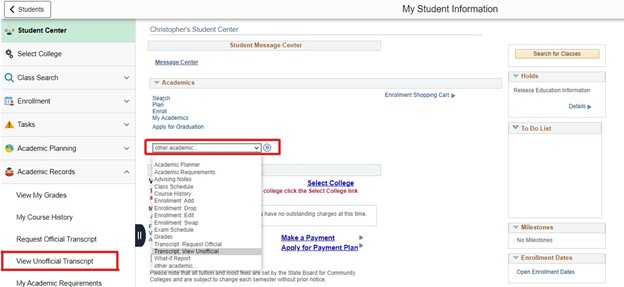
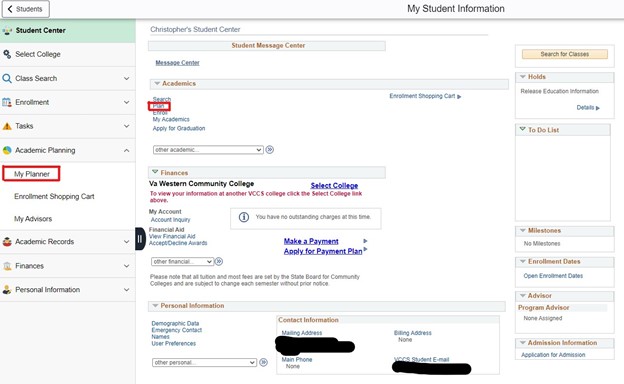
To Access My Planner

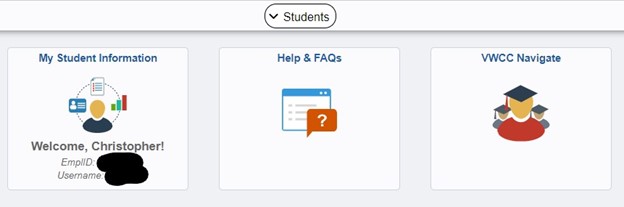
To access My Planner, you must be logged into MyVWCC and inside the Student Information System.

  1. Click on your Student Information tile.
    SIS Student Home Screen
  2. From the Student Center you can either click the Plan link in the Academics section or select Academic Planning > My Planner from the left-hand menu.
    link to planner

Adding Courses to My Planner

Using the Plan By My Requirements Option

  1. On the My Planner page, click Plan By My Requirements. You may also use Browse Course Catalog (instructions below), but this is not the suggested method. Using Plan By My Requirements ensures the planned courses will satisfy your degree requirements.
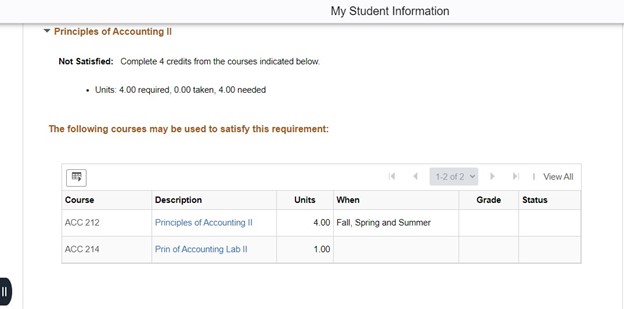
  2. The required courses for your degree program will be displayed on the page. Note: By default, satisfied requirements are collapsed and not satisfied requirements are expanded.
    Key:
    collapse all button – Collapses all of the sections of a report
    expand all button – Expands all of the sections of a report
    Taken Indicator – Indicates if a class has been completed
    In Progress indicator – Indicates if a class is currently in progress and not yet graded
    Planned Indicator – Indicates if a class is planned
  3. To add a course to your planner, click on the Description link for the desired course under The following courses may be used to satisfy this requirement.
    add class to planner
  4. Information about the course, such as the course description, will be displayed on the Course Detail page.
    planner - course details
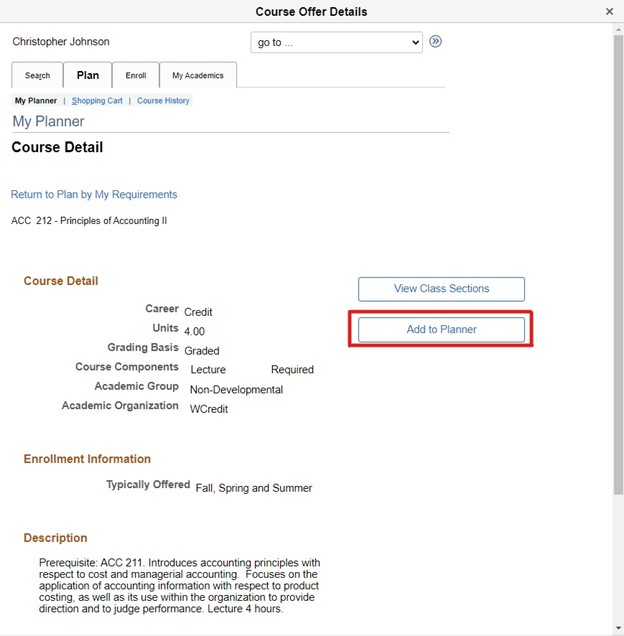
  5. Click Add to Planner, or View Class Sections. If you use View Class Sections:
    1. Click on the drop-down menu and select the Term, then click the Show Sections button. In some instances, the course you select may not be offered for the term selected. If the course is not offered for that term, the following message will be displayed: *** This course has not been scheduled. ***
    2. If you select a term and the Select button for class sections is not available, then the enrollment planning period has not yet started or has passed. For some terms, students may plan for their enrollment several days prior to the beginning of the open enrollment period.
    3. If the Select button is clicked, the class section is added to your Enrollment Shopping Cart where you can continue through the enrollment process (if enrollment is open) or click Next to continue adding courses to your planner.
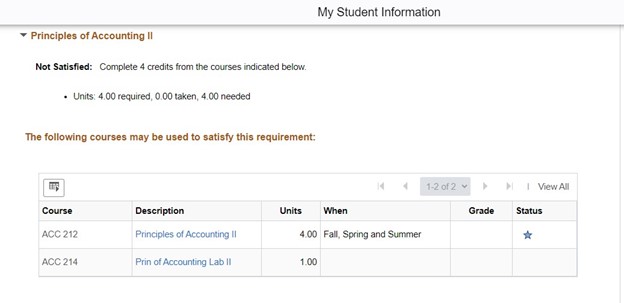
  6. To continue planning by your requirements, click Return to Plan by My Requirements. You will see the courses you have selected. The status of these courses will be Planned (planned indicator).
    class added to planner
  7. To view courses in your planner, click My Planner at the top of the page. Any class sections that were added to your enrollment shopping cart will not appear in your Planner but will appear on your Plan By My Requirements Report. The i icon (i icon) indicates that the course will satisfy a requirement for your degree plan.
    My Planner

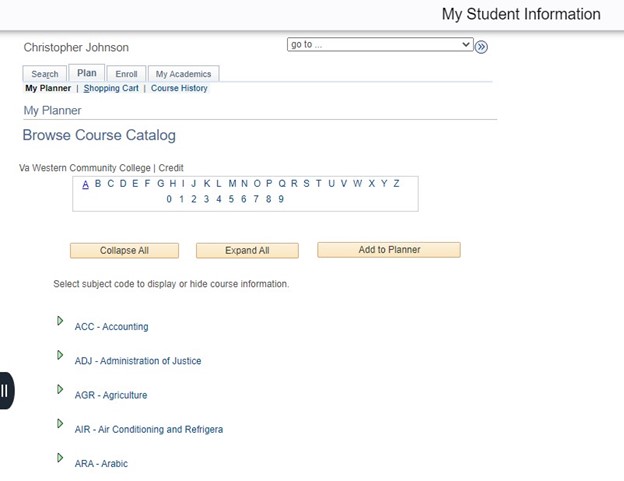
Using the Browse Course Catalog Option

Caution: When using this option, all courses are returned, not just those required for your degree program.

  1. On the My Planner page, click the Browse Course Catalog button.
  2. On the Browse Course Catalog page, select the letter of the alphabet that corresponds to the subject code of the course you are searching for.
  3. Scroll through the list of subjects until you find the one you need, then click on the subject code to display the courses.
    Planner course browse
  4. From the displayed list of courses, click the box in the Select column to add the course to your planner, then click Add to Planner.
    add course to planner with browse
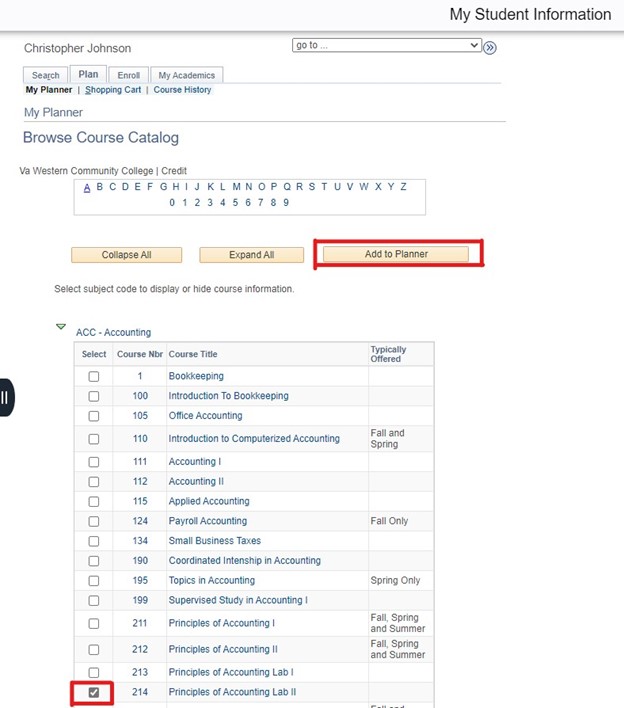
  5. Note the message that indicates the course has been added to your planner. To view your planner, click My Planner at the top of the page.

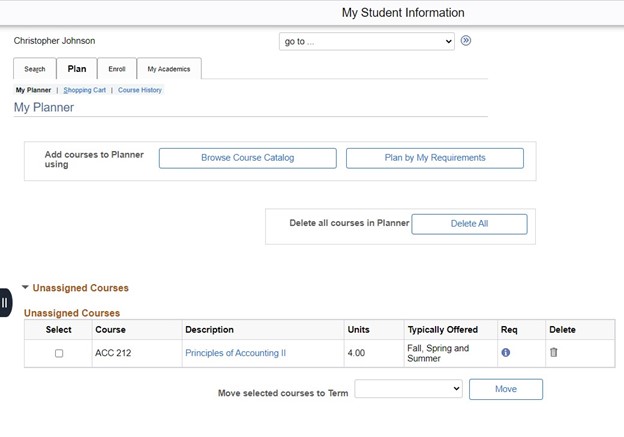
Moving and Deleting Courses in the Planner

After adding courses to your planner, you can also delete these courses, organize them into specific terms, or move them from your planner to the enrollment shopping cart (if enrollment is open).

To delete a course, use the trash can icon (trash can icon). To delete all courses, use the Delete All button.

To move a course, check the box in the Select column next to the class you wish to move, use the Move selected courses to Term drop-down to select a term, and click move. You will receive a confirmation message.

To move a course to your enrollment shopping cart:

  1. Make sure the course has been moved to the correct term in My Planner.
  2. Click the Shopping Cart tab at the top of the page.
  3. If necessary, select the desired term and click Continue.
  4. Select My Planner and click Search.
    search planner
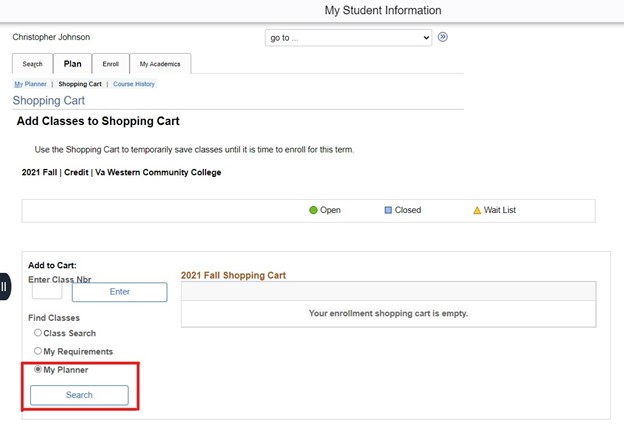
  5. Click Select next to the appropriate class. A listing of available class sections will be displayed. Click Select next to the desired class section. The class will be added to your enrollment shopping cart where you may continue through the enrollment process.