When a laptop is off campus for an extended period of time, the user account password expires and must be changed on the user’s college account. The old password on the laptop then becomes out of sync with the password on the account. Upon return to campus the laptop wireless will not connect using the old password until the password is updated to match the current password.
Resolution Action:
You must connect to the college network to synchronize the new password to the laptop.
To correct this problem, follow this procedure:
Bring the laptop to campus to any location with wifi (any indoor area and some outdoor locations near emergency call boxes. You will see the network ID when in range)
Power up the laptop
Login with the old password and follow the steps below to manually connect to the wireless network
Manually Connect to VWCCWifi
For advanced users, you may jump ahead here if you know how connect. If you do not, see the detailed instructions below.
Jump Ahead Note: When you connect manually, enter you user ID in this format VW\vwyourid with your new password.
Log out and back in to sync passwords and get all your settings.
See end of these instructions: Update Your Computer! Be sure to check for updates
Detailed Connection Instructions
Use the Windows Search at the lower right of your screen.
Type “Settings” and then press Enter to search.
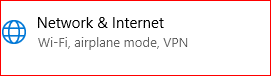
In the Windows Settings screen, choose the Network & Internet option.
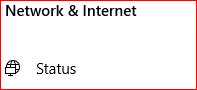
Select Status.
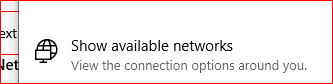
Scroll to Show Available Networks.
Choose VWCCWifi.
Enter your user ID in this format — VW\vwyourid — with your NEW password. Log out and back in to sync your passwords and get all your settings.
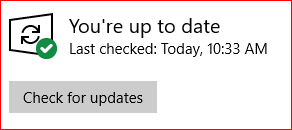
Update Your Computer
Don’t forget to check for Windows Updates! These are very important security updates which protect your computer.
Use the Windows Search at the lower right of your screen.
Type “Updates” and press Enter.
Select the Check for Updates option.
Apply your updates and restart. Note: If you are prompted to upgrade to Windows 11, do not update until you have direction and are comfortable with with using Windows 11.
If you have already enrolled in another MFA method it will be set as your backup MFA method on March 1, 2022.
What if I have questions?
If you have questions about these steps or need help during the process, please contact the VWCC Help Desk at 540-857-7354, by email at helpdesk@virginiawestern.edu or in person at the Business Science Building (M273).
IET recently implemented changes to the college email system to comply with VCCS standard 20.5. These changes are intended to improve security and email processing.
Background:
Email is a mission critical communication tool that unfortunately, can be used maliciously to compromise security. Everyday thousands of emails are sent to our user community, attempting to obtain personal information, money or account credentials. VWCC Email is filtered to remove as many messages containing junk, malware, phishing links and advertisements as practical while delivering the rest of the actual good messages. This process is part automated and part user managed.
How do these changes affect me?
The recent changes removed the Barracuda Anti-Spam system from the mail flow. As a result, you will notice these changes:
You no longer get messages from this system to check your Barracuda email quarantine.
Check your Junk Mail folder periodically to ensure that legitimate mail is not landing there. If you do see email there, mark it as Not Junk and it will move to your Inbox. Most SPAM and advertisement emails will end up here.
Advertisements and other Email that is not desirable may land in your Inbox. Mark these as Junk to train the system to put emails of that nature in Junk. This will reduce the amount of unwanted email in your Inbox, but some unwanted messages may continue to get through.
Some Email will be tagged with messages to help you identify the type of mail. Message tags indicating (Spam) (Personal)
Message headers are enabled to notify that mail originates outside the college. This helps raise awareness of the email source and is particularly helpful at identifying emails that impersonate a person or service. If an email is shown as external and is representing a college service or user, it is suspect.
Email that is particularly suspicious of phishing (a way of luring a user to provide information or click a link to a hack) will be sent to a quarantine location. Each day a process runs to see if there is an email in this quarantine, providing a chance for review and release if a legitimate message has been incorrectly classified.
Email Access and SPAM
Email can be accessed in 2 ways.
You may use a web browser and log in to Office.com with your email address and VWCC password. This is Outlook Web Access or Webmail. Webmail can be accessed from any computer.
You can use the local Microsoft Outlook client installed on a desktop, laptop, tablet or phone. This option downloads messages for local access even when not connected to the Internet. Email can be read and composed without Internet access. An Internet connection must be present to send and receive using the full client.
How can I find email that I may be missing?
Email is stored in the Microsoft Cloud, on the local storage of a device using the full Outlook client and a copy is also stored on the Barracuda Mail Archiver. Occasionally email will be “lost”, requiring a search to find out where it may be.
Junk and Spam
Filtering is used in the email environment to prevent malicious emails, particularly ones that are “phishing” trying to obtain user credentials or in some way have a negative impact on the recipient. Some legitimate emails can be misclassified and hung up in the mail system, classified as Junk or Spam. .
Email may go to the Office Cloud Junk folder
Use a web browser and log in to Office.com with your email address and VWCC password. This is Outlook Web Access (Webmail). Search in the Junk Folder for your missing email.
Email may go to the Outlook Junk folder
Open the local Outlook client. If a message is missing from the user’s Inbox, the first action would be to check the Junk folder in the Outlook client being used. This will be either Outlook on the device or using the browser-based Outlook Web Access. Simply go to the Junk folder and search for the email by sender or date.
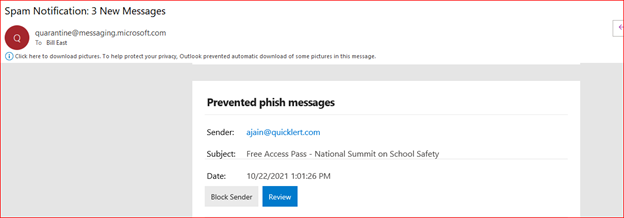
Email may go to the Quarantine
Email filters look for messages that may contain phishing. It will then move them to quarantine for user review. This area is checked each day for content and if there are messages to review and email like the one below will be sent to the mailbox owner. If the email is legitimate, the user can release it to their mailbox and if not, they can trash it.
Email Archiving
All email sent to and from virginiawestern.edu accounts is copied to a mail archival system. This archiving device provides search capabilities for all emails the college has ever sent or received. Users may login to this link with their email address and search the message library.
If you suspect that you are missing an email that was sent to you, check the following:
Check the Junk folder in your Webmail (Office.com online or Microsoft Web Outlook). If you use the Outlook client app, check for the message in that client Junk folder too.
Review any quarantine notifications from Microsoft.
Check the Archiver.
Report the missing email to the Help Desk.
If you have questions about the information we provided, please contact the Help Desk. We will be glad to personally assist you and answer any related questions you may have. Please check the Information & Educational Technologies web page and SharePoint site for various notices including upcoming deployments.
Do I need to finish the MFA setup once I start it?
Yes, if you do not finish the setup of MFA it will cause you to have login issues later.
Which MFA option should I use?
The VCCS recommends the Push MFA option (using the Rapid Identity App) as being the most secure, but any of the options can be used.
Why am I not receiving the Rapid Identity PingMe Authentication Notice on my phone?
Verify that the phone’s date and time are automatically syncing.
If the time and date on your device is not set to automatically sync the time may be incorrect and that will cause authentication to fail for all MFA methods. Here are the locations of this setting on iPhones and Androids.
iPhone – Settings, General, Date & Time, the Set Automatically toggle box should be turned on.
Android – Settings, General Management, Date and Time, the Automatic date and toggle box should be turned on.
The location for the Date & Time settings may vary depending on the version of your phone’s operations system. If the paths above do not work for your phone, you will need to do a web search for the correct location.
Verify that you are allowing the Rapid Identity App on your phone to send you notifications.
Verify that your phone is not in Do Not Disturb mode.
Some Android phones and OS combinations seem to have issues with using the PingMe Options in the Rapid Identity App.
Some devices on 9.x and 8.x, have issues, no higher versions have reported issues. In those cases, you will need to switch to one of the TOTP MFA options.
Please contact the Help Desk (540-857-7354) if you have questions.
My RapidIdentity App is no longer working, what should I do?
Try closing and reopening the app.
Turn the device that has the Rapid Identity app on it off and back on. If that does not work, please contact the Help Desk (540-857-7354).
How do I add or correct the phone number associated with my account?
The Virginia Community College System (VCCS) updated the MyVWCC portal and Multi-factor Authentication (MFA) is now available to all students, faculty and staff to add another level of security to protect your information.
VWCC secures sensitive data accessed from off-campus locations for all users using two-factor authentication. This secures access to sensitive data from off-campus, and you need to ensure that you are setup for authentication via your Office365 account credentials on your desktop or mobile device of choice. Please contact the Help Desk if you have problems following the instructions below.
Microsoft Azure Multi Factor Authentication
Multi Factor Authentication (MFA) ensures that you are who you claim to be by requiring multiple credentials from you before you are given access to software and/or resources. Microsoft Azure MFA integrates this authentication with your Offce365 login so you can also use it for access to your VDI desktop with minimum interactions. One of the biggest advantages of this process is that you do not have to login to your VDI a second time as you are pre-authenticated with your Microsoft account for Office365. If you are unsure if you have been enabled to use this, please contact the VWCC Help Desk.
Accessing your Virtual Desktop
All off-campus access uses the secure gateway at remote.virginiawestern.edu using Microsoft MFA. If you are not able to use this gateway, please contact the Help Desk.
To Access Your Virtual Desktop with VMWare Horizon
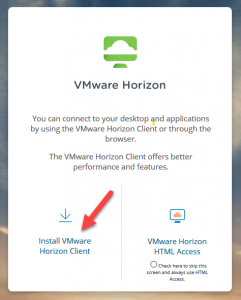
The instructions assume that you are off-campus and are using a computer or laptop or some other device which you will use to access your remote VDI desktop and do not already have the VMware client installed. If you already have the client, skip to the next step. Open your web browser of choice and go to https://remote.virginiawestern.edu. You should see a screen like the one on the right. Click on the option to Install VMware Horizon Client. This will take you to the VMware software download page with options to install the VMware Horizon client on your computer. Pick the one appropriate for your computer (i.e. Windows or Mac) and download and run the software to install it on the computer. You might have to reboot the computer to complete the install.
Once the Horizon Desktop client or iOS app is installed, open it by clicking on the icon on your desktop.
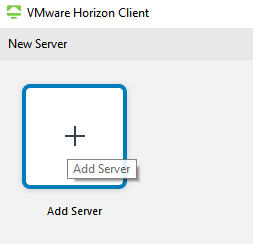
If this is the first time you are using it, the empty Horizon client screen will open up. If, however, you have used the Horizon Client before, you will have other server icons on the window and need to click on the New Server option on the top left and add the entry for the remote.virginiawestern.edu server. If you had been using any other server, you must switch to the one noted above (remote.virginiawestern.edu) before you log in. Please contact the VWCC Help Desk if you need assistance with this.
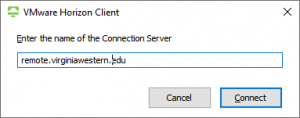
Click on the Add Server icon and type in remote.virginiawestern.edu and click on Connect. Your default browser window will open up, ask you to accept the disclaimer and ask you if you want to open the connection using the Horizon client. Click accept and check the box saying that you want this to be the default, so it will not ask you the next time. That’s all you need to do as the VDI client will use your Office 365 credentials to log you in, as you normally do when using the other Office applications. You can close the browser window once you are connected. That’s it, you should now have access to your VDI desktop.
A d-list does not store the emails, they are forwarded to individual accounts. When you reply to an email received, it comes from your individual email, not the d-list email address.
A shared email account is a separate email account that more than one person has access to. To access the account, you must log on through Office 365 Webmail. Replies to emails come from the shared account’s address.
To request a d-list or shared email account, you must complete a Security Access Request Form (SARF). You will receive an email from the Help Desk when the account has been created.
To request a d-list
Access the electronic SARF on VWConnect (see the link above for assistance). Complete all of the information at the top of the form.
For “Is this request for an existing employee?”, mark Yes. In the comment field, enter what the request is for.
For “Is this a position or department change?”, mark No.
For “Name Change?”, mark No.
For “Replacement of VWCC Employee?”, mark No.
Check the box next to D-list email account needed.
Check either Yes or No for “D-list needs to receive emails from off campus?”.
Select the option for D-list.
In the Name of account field, enter the email address you would like.
Select the names of the employees that you want to receive the email.
Put the name of the supervisor at the bottom of the form. The supervisor cannot be the same person listed at the top of the form.
To request a shared email account
Access the electronic SARF on VWConnect (see the link above for assistance). Complete all of the information at the top of the form.
For “Is this request for an existing employee?”, mark Yes. In the comment field, enter what the request is for.
For “Is this a position or department change?”, mark No.
For “Name Change?”, mark No.
For “Replacement of VWCC Employee?”, mark No.
Check the box next to D-list email account needed.
Check either Yes or No for “D-list needs to receive emails from off campus?”.
Select the option for Shared Email.
In the Name of account field, enter the email address you would like.
Select the names of the employees that you want to have access to the account.
Put the name of the supervisor at the bottom of the form. The supervisor cannot be the same person listed at the top of the form.
The instructions assume that you are on-campus and are using a computer or laptop or some other device which you will use to access your remote VDI desktop and do not already have the VMware client installed. If you already have the client, skip to the next step. Open your web browser of choice and go to https://campusview.vw.edu. You should see a screen like the one on the right. If you get a warning regarding the security on the certificates, accept the warnings and proceed to the page. Click on the option to Install VMware Horizon Client. This will take you to the VMware software download page with options to install the VMware Horizon client on your computer. Pick the one appropriate for your computer (i.e. Windows or Mac) and download and run the software to install it on the computer. You might have to reboot the computer to complete the install. If you have problems with the install, please contact the Help Desk for assistance.
Once the Horizon Desktop client or iOS app is installed, open it by clicking on the icon on your desktop.
If this is the first time you are using it, the empty Horizon client screen will open up as shown on the right. If, however, you have used the Horizon Client before, you will have other server icons on the window and need to click on the New Server option on the top left and add a new entry for the campusview.vw.edu server. If you had been using any other server, you must switch to the one noted above (campusview.vw.edu) before you log in. As always, please contact the VWCC Help Desk if you need assistance with this.
Access your virtual desktop with a web browser (single display only)
NOTE: If you are on a public workstation, or on a device where you cannot install software:
Click the large VMware Horizon HTML Access button on the right (see the screen shot for item 1 in the previous section).
Click the green Accept button to continue.
Enter your VWCC email and password and click Login. You will be asked to verify the login using your previously configured 2-Factor authentication method, and once authenticated you will be able to access your VDI. For more details on 2-Factor Authentication, check this page.
Click the computer icon to open your virtual desktop within your browser.
The Help Desk has a limited number of laptops that are available for checkout to faculty and staff. We recommend contacting the Help Desk several days ahead of time to ensure that a laptop will be available.
If other equipment is needed, please contact the Help Desk so we can see if we have anything available for your needs.
Printing Services is a full-service printing department at Virginia Western. Services include duplication of materials for classroom use, printing of official college documents, and public information materials. They are located in Anderson Hall, room A156.