View Holds

To view any holds on your account, you must be logged into MyVWCC and inside the Student Information System.

  1. Click on your Student Information tile.
    SIS Student Home Screen
  2. On the right side of your Student Center page, locate the box titled Holds. Any holds will be listed in that box.
    View your Student Account Holds

Make a Payment

To make an online payment, you must be logged into MyVWCC and inside the Student Information System.

  1. Click on your Student Information tile.
    SIS Student Home Screen
  2. In the Student Center, scroll down to the Finances section.
  3. Click Make a Payment. This will take you to the third party payment website.

For information on setting up and using your account, go to Making an Online Payment.

Using My Planner

My Planner allows you to plan your courses for one semester or for future semesters by searching the course catalog or by using the academic requirements for your degree. To ensure that the courses added to your Planner will satisfy your degree requirements, it is suggested that you use the Plan by Requirements option.

Note: The My Planner option is not the same as actual enrollment in a class, it is only a planning tool.

To Access My Planner

To access My Planner, you must be logged into MyVWCC and inside the Student Information System.

  1. Click on your Student Information tile.
    SIS Student Home Screen
  2. From the Student Center you can either click the Plan link in the Academics section or select Academic Planning > My Planner from the left-hand menu.
    link to planner

Adding Courses to My Planner

Using the Plan By My Requirements Option

  1. On the My Planner page, click Plan By My Requirements. You may also use Browse Course Catalog (instructions below), but this is not the suggested method. Using Plan By My Requirements ensures the planned courses will satisfy your degree requirements.
  2. The required courses for your degree program will be displayed on the page. Note: By default, satisfied requirements are collapsed and not satisfied requirements are expanded.
    Key:
    collapse all button – Collapses all of the sections of a report
    expand all button – Expands all of the sections of a report
    Taken Indicator – Indicates if a class has been completed
    In Progress indicator – Indicates if a class is currently in progress and not yet graded
    Planned Indicator – Indicates if a class is planned
  3. To add a course to your planner, click on the Description link for the desired course under The following courses may be used to satisfy this requirement.
    add class to planner
  4. Information about the course, such as the course description, will be displayed on the Course Detail page.
    planner - course details
  5. Click Add to Planner, or View Class Sections. If you use View Class Sections:
    1. Click on the drop-down menu and select the Term, then click the Show Sections button. In some instances, the course you select may not be offered for the term selected. If the course is not offered for that term, the following message will be displayed: *** This course has not been scheduled. ***
    2. If you select a term and the Select button for class sections is not available, then the enrollment planning period has not yet started or has passed. For some terms, students may plan for their enrollment several days prior to the beginning of the open enrollment period.
    3. If the Select button is clicked, the class section is added to your Enrollment Shopping Cart where you can continue through the enrollment process (if enrollment is open) or click Next to continue adding courses to your planner.
  6. To continue planning by your requirements, click Return to Plan by My Requirements. You will see the courses you have selected. The status of these courses will be Planned (planned indicator).
    class added to planner
  7. To view courses in your planner, click My Planner at the top of the page. Any class sections that were added to your enrollment shopping cart will not appear in your Planner but will appear on your Plan By My Requirements Report. The i icon (i icon) indicates that the course will satisfy a requirement for your degree plan.
    My Planner

Using the Browse Course Catalog Option

Caution: When using this option, all courses are returned, not just those required for your degree program.

  1. On the My Planner page, click the Browse Course Catalog button.
  2. On the Browse Course Catalog page, select the letter of the alphabet that corresponds to the subject code of the course you are searching for.
  3. Scroll through the list of subjects until you find the one you need, then click on the subject code to display the courses.
    Planner course browse
  4. From the displayed list of courses, click the box in the Select column to add the course to your planner, then click Add to Planner.
    add course to planner with browse
  5. Note the message that indicates the course has been added to your planner. To view your planner, click My Planner at the top of the page.

Moving and Deleting Courses in the Planner

After adding courses to your planner, you can also delete these courses, organize them into specific terms, or move them from your planner to the enrollment shopping cart (if enrollment is open).

To delete a course, use the trash can icon (trash can icon). To delete all courses, use the Delete All button.

To move a course, check the box in the Select column next to the class you wish to move, use the Move selected courses to Term drop-down to select a term, and click move. You will receive a confirmation message.

To move a course to your enrollment shopping cart:

  1. Make sure the course has been moved to the correct term in My Planner.
  2. Click the Shopping Cart tab at the top of the page.
  3. If necessary, select the desired term and click Continue.
  4. Select My Planner and click Search.
    search planner
  5. Click Select next to the appropriate class. A listing of available class sections will be displayed. Click Select next to the desired class section. The class will be added to your enrollment shopping cart where you may continue through the enrollment process.

Drop a Class

To drop a class, you must be logged into MyVWCC and inside the Student Information System.

  1. Click on your Student Information tile.
    SIS Student Home Screen
  2. Click on Enrollment in the left menu, then Drop Classes.
  3. Click the Select box next to the classes you wish to drop.
    Drop a Class
  4. To process your drop request, click Drop Selected Classes.
  5. To confirm your drop request, click Finish Dropping.
    Confirm Dropped Class
  6. View the results for drop confirmations or errors. If there are no errors, each class will display Success in the Message column. If an error is identified, Error will display in the message column.
  7. To view your revised schedule, click My Class Schedule & Book Info.

Important Notes

  • If you drop after the last day to receive a refund for the class and prior to the class withdrawal deadline (see academic calendar), you will receive a grade of “W”.
  • If you drop after the class withdrawal deadline (see academic calendar), you will receive a grade of “F”.

Using the Wait List for Closed Class Sections

About the Wait List

The Wait List function allows students to place themselves on a Wait List for a class section that is full and be given a position number.   If seats become available in the class section, the wait list process will run to auto-enroll students according to their Wait List position number.

Joining a Wait List does not guarantee enrollment in a course.   It is the student’s responsibility to monitor their Wait List position regularly and make enrollment decisions based on that position. Students will not receive communication from Virginia Western regarding their Wait List position or any errors that occur in the process of enrolling in a class from the Wait List.  Students will receive an email to their Virginia Western email account if they are enrolled in a class from the wait list. It is the student’s responsibility to monitor enrollment through their MyVWCC account.

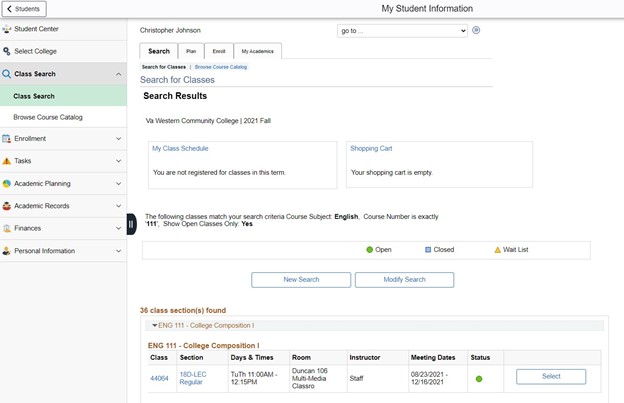
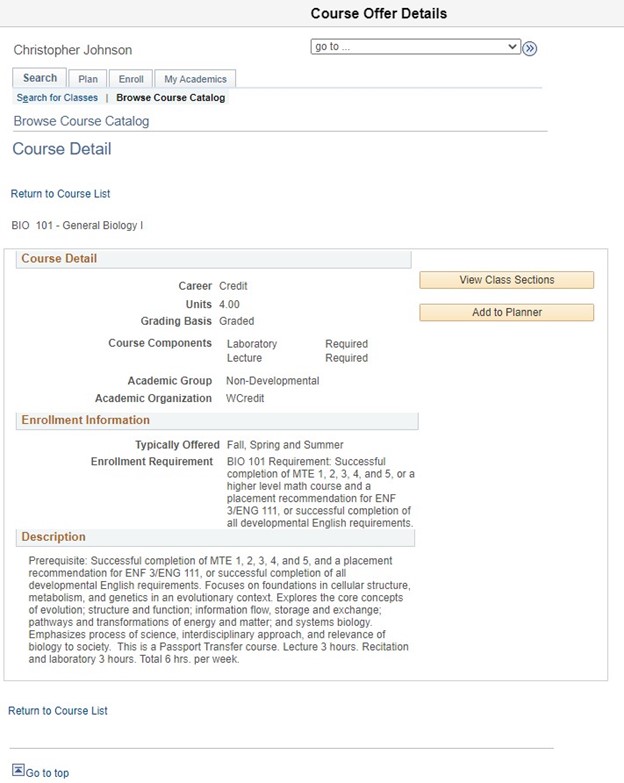
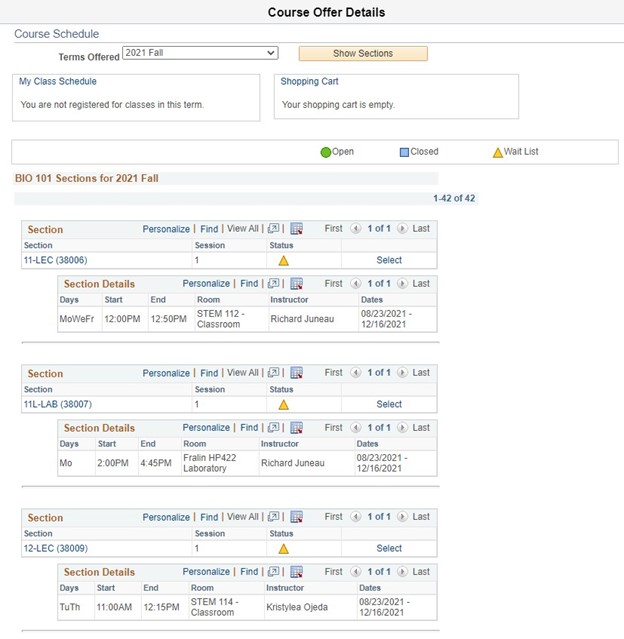
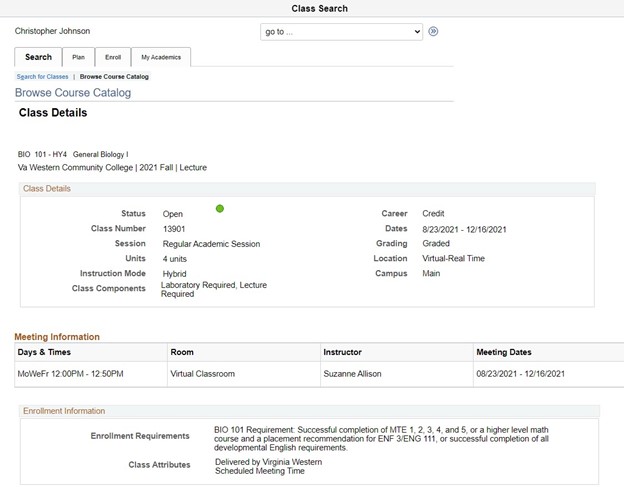
The Wait List function is not currently available for all class sections.  If a class section is closed and a Wait List is available, you will see the Wait List icon (wait list icon) as the status for the class.

The following factors will prevent a student from using the Wait List:

  • Prerequisites for the class are not met
  • A negative service indicator exists on the student’s record
  • The student has already enrolled in the same class section
  • Last date to Wait List for classes has passed
  • The Wait List capacity for the class has been met
  • Maximum number of Wait List units has been reached
  • The class is not closed

The following factors will prevent a student from being enrolled in a class while on the Wait List:

  • Adding the Wait Listed class will exceed the maximum number of units allowed for enrollment
  • The student has exceeded the number of enrollment attempts for the class (repeat rule)
  • The last date to enroll has passed
  • The Wait Listed class presents a time scheduling conflict with another class
  • The student is enrolled in another section of the same class

Students may Wait List for more than one section of the same class.

  • Students cannot choose their preference for which class section they will be enrolled first.  The Wait List process will enroll the student in the class section that has the first available seat.  The student will then be removed from the Wait List for any other sections of the same class.

Students are not notified automatically when they have been moved (enrolled) from the Wait List to the class.

  • If a student adds themselves to a Wait List, they must monitor their class schedule every morning.  This is the only way to determine if they have been moved from the Wait List to the class.
  • When a student has been moved from the Wait List to the class, tuition payment must be made by the tuition payment deadline.

Wait List Frequently Asked Questions (PDF)

When You Should SWAP Enrollment

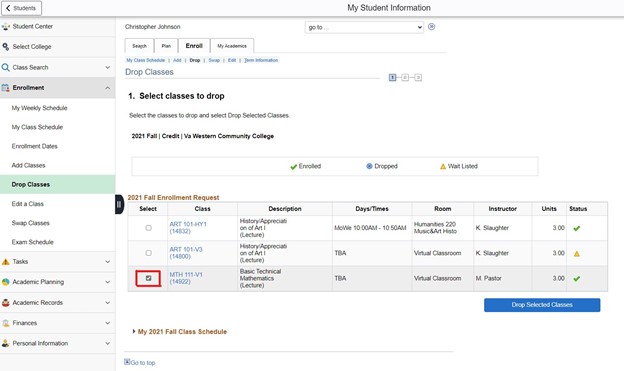
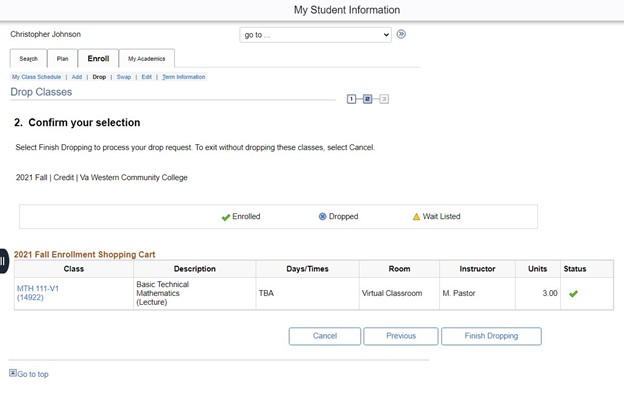
If a student is already enrolled in another section of the same class for which they want to Wait List, SWAP should be used. If the student uses the Enroll/Add feature to get on a Wait List for a different section of the same class, they must Drop the section in which they are enrolled before they will be moved from the Wait List into the preferred class section. This is dependent upon a seat becoming available in the wait-listed class section.

Students may also use SWAP if there is a known time conflict between an already enrolled class section and the preferred class section they want to Wait List. If the student gets on a Wait List using the Enroll/Add feature, they will not be auto-enrolled into the wait-listed class (if a seat becomes available) until they Drop the class that presents the time conflict.

Students may want to use SWAP if they are already enrolled in the maximum number of units for the term and want to still get on a Wait List for a closed class section. If a student gets on a Wait List using the Enroll/Add feature, they will not be auto-enrolled into the wait-listed class until they Drop a class that would allow the wait-listed class to fall within the maximum number of units to be enrolled in for a term. This is dependent upon a seat becoming available in the wait-listed class section.

For instructions on using the SWAP feature, refer to Wait List – When and How to Swap Enrollment.

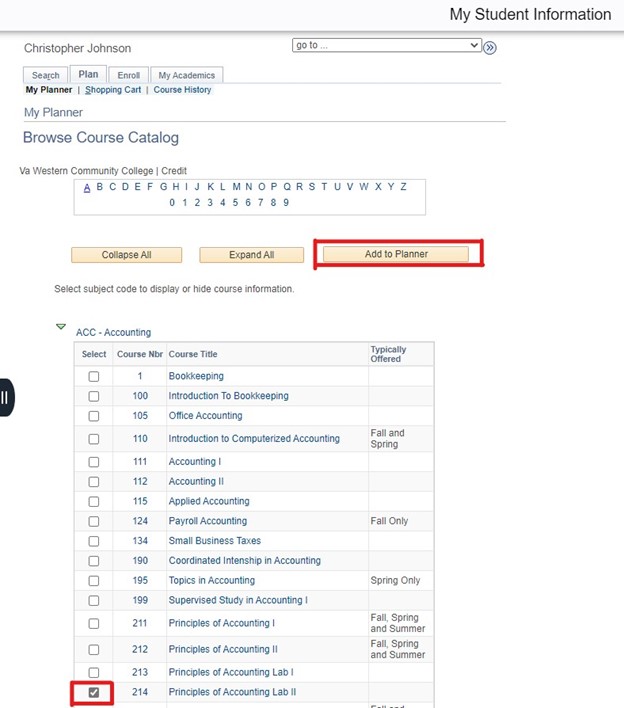
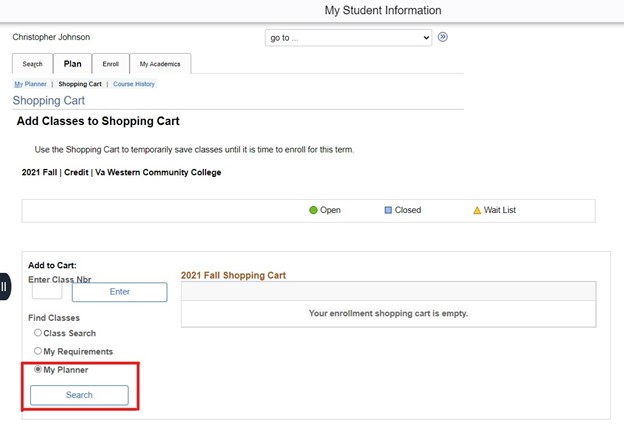
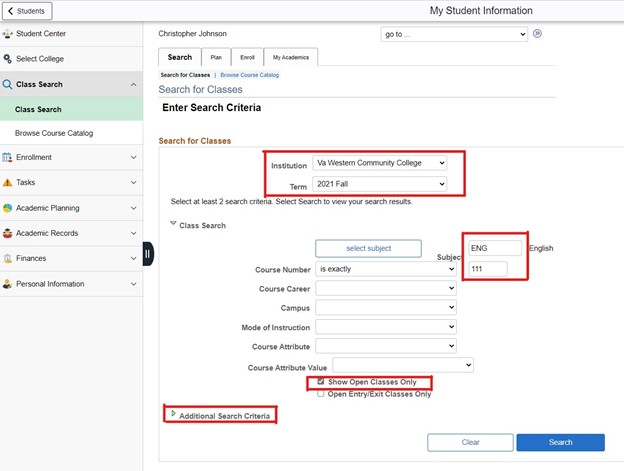
How to Join the Wait List

To join the wait list for a class, you must be logged into MyVWCC and inside the Student Information System.

  1. Click your Student Information tile.
    SIS Student Home Screen
  2. Use the instructions to Add/Enroll in a Class, and continue to step 3 if you find one that has a waiting list.
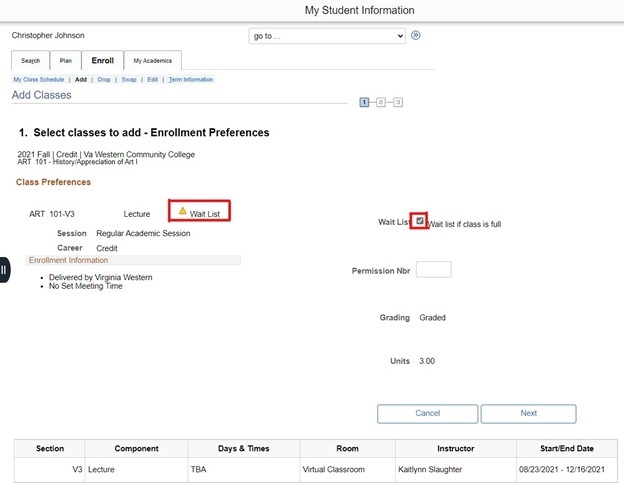
  3. A class that is full but that has a Wait List will be designated by a yellow triangle on the Enrollment Preferences page once the class is selected. You MUST check the box marked Wait List before you click next. Otherwise, you will get an error that the class is already full when you try to complete enrollment and it will not add you to the waiting list.
    Add Class that is full
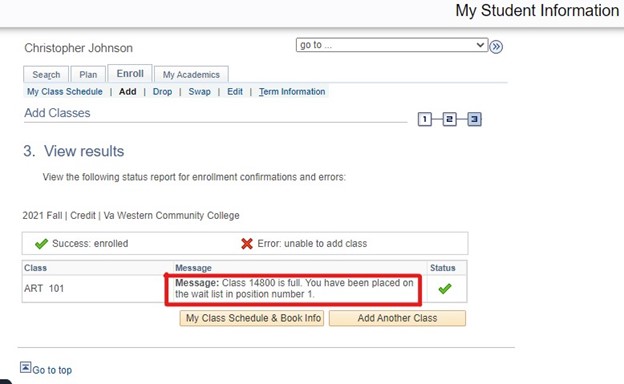
  4. Once you complete your enrollment by confirming the classes in your Shopping Cart, you will receive a message on the results screen with your position on the wait list. You will be required to keep checking your status because you will not receive a notification once you have been moved from the wait list into the class.
    Wait List Message

Search for a Class

To search the Course Catalog within the Student Information System, you must be logged into MyVWCC and inside the Student Information System.

  1. Click on your Student Information tile.
    SIS Student Home Screen
  2. Click on the Class Search dropdown menu on the left, then select Class Search.
    Class Search Screen
  3. Make sure you have selected the correct institution and term from the dropdown menus.
  4. Enter at least two of the following Class Search Criteria:
    • Course Subject: The course subject is an abbreviation, generally three letters (ACC, BUS, MTH, etc.). If you are unsure of which abbreviation to use, click the blue select subject button.
    • Course Number: generally a 3-digit number
    • Course Career: generally “Credit”. Non-credit courses are registered for in the Workforce Enterprise System.
    • Campus: the only option is “Main”.
    • Mode of Instruction: The mode of instruction is the type of class (in person, online, hybrid, etc.)
  5. To view only class sections with seats available, select Show Open Classes Only.
  6. To enter additional search criteria such as meeting time or location, click Additional Search Criteria.
  7. Click the blue Search button.
  8. If you would like more detailed information about the class you can click the links under either the Class or Section headers. If you click the Select button on the right it will take you to a screen where you can add the class to your Shopping Cart.
    Class Search Results

Browse the Course Catalog

To browse the Course Catalog, you must be logged into MyVWCC and inside the Student Information System.

  1. Click on your Student Information tile.
    SIS Student Home Screen
  2. Click on Class Search on the left menu, then select Browse Course Catalog.
    Browse the Catalog
  3. Make sure Virginia Western Community College is selected as the institution.
  4. You will see the Course List. To navigate to a different section of the catalog, click one of the letters at the top of the screen, then click the arrow beside a listing to expand that category.
    Class Search Screen
  5. Select the Course Title of the course you are interested in. The course description is shown, along with prerequisites for the course. You can add any of these courses to your student planner by clicking the Add to Planner button.
    Class Search - Class Details
  6. To view the sections of a course, click the View Class Sections button. This will pop open a new section for the Course Schedule at the bottom of the screen. Make a selection in the Term Offered dropdown and click the Show Sections button to update the displayed classes.
    Class Search - Section List
  7. If you would like to see more details for a class you can click the link in the Section portion of the listing.
    Class Search - Section Details